Configuring Authorize.Net for Easybooking Payment Integration and Validation
Follow this document from beginning to end to configure Authorize.Net for TBS Portal, validate the payment flow, and move a validated configuration to Production. The procedure intentionally separates merchant-account configuration, TBS Portal configuration, user payment behavior, and transaction validation so QA, Support, and customers can identify where a failure occurs.
Integration Method
Payment Integration:
Authorize.NetAccept HostedPayment Form:
Authorize.Nethosted payment form embedded within EasyBookingSupported Payment Types: Credit Cards (Visa, MasterCard, Discover, American Express)
PCI Scope:
Authorize.NetAccept Hosted hosts the payment form, so sensitive card information—including the full card number and CVV—is entered directly into theAuthorize.Net-hosted payment form rather than TBS Portal.
Scope and supported functionality
The TBS Portal integration uses Authorize.Net Accept Hosted. The payment form is hosted by Authorize.Net and displayed within the EasyBooking kiosk/payment experience. Sensitive card information, including the full card number and CVV, is entered into the Authorize.Net hosted form rather than into TBS Portal.
Capability |
Supported / Configuration Requirement |
|---|---|
Credit cards |
Supported: Visa, MasterCard, Discover, American Express. |
CVV |
Supported. |
Billing Information |
Supported. |
Supported. |
|
Customer ID |
Supported; Customer ID is configured as Required in |
HTTPS |
Required for payment processing. |
Unsupported Features
The following capabilities are not currently supported or enabled in the EasyBooking payment implementation.
Capability |
Status / Notes |
|---|---|
PO Number |
Not currently supported as a user-editable field. Not shown in the Payment Form. |
Shipping Information |
Not currently enabled or supported in the EasyBooking implementation. Not shown in the Payment Form. |
CAPTCHA |
Not currently enabled or supported in the EasyBooking implementation. Not shown in the Payment Form. |
Saved Payment Profile |
Unsupported. |
ACH / Bank Account |
Unsupported. |
Prerequisites
An
Authorize.Netmerchant account in either Sandbox or Production, with access to the Merchant Interface.TBS Portal administrator access to Settings -> Configuration -> EasyBooking -> KAPI Config -> Authorize Gateway.
An application environment that is reachable through HTTPS. HTTP, localhost, and 127.0.0.1 are not supported for TBS Portal payment testing.
A test patron/account in the TBS Portal / EasyBooking environment when performing the full end-to-end test.
A test card supported by the
Authorize.NetSandbox for Sandbox validation. Never use Sandbox card numbers in Production.
Admin Setup Guide
Authoize.NET Account Configuration
How to Setup Authorize.NET for easybooking fees/fines Module
Environment Matching Requirement
The API Login ID and Transaction Key must belong to the same Authorize.Net environment.
TBS Portal Environment |
API Login ID |
Transaction Key |
TBS "Is Test Mode" |
|---|---|---|---|
Sandbox |
Sandbox API Login ID |
Sandbox Transaction Key |
Enabled |
Production |
Production API Login ID |
Production Transaction Key |
Disabled |
Do not use Sandbox credentials with Production configuration. Do not use Production credentials with Sandbox configuration.
The API Login ID and Transaction Key will be entered into the TBS Portal → Settings → Configuration → EasyBooking → KAPI Config → Authorize Gateway section during TBS Portal configuration.
Adding Fees/Fines Payment Options to TBS Portal using Authorize.NET
Configure Accept Hosted Settings
NOTE: These settings in the Authorize.Net portal must be configured correctly.
Log in to the appropriate Authorize.Net Merchant Interface and navigate to:
Account → User Profile → Payment Form → Form Settings
Select Payment Form – Fields to configure the fields displayed on the Authorize.Net-hosted payment form.
Approved Payment Form Configuration
The Payment Form – Fields configuration must match the approved TBS configuration shown in the screenshot below.
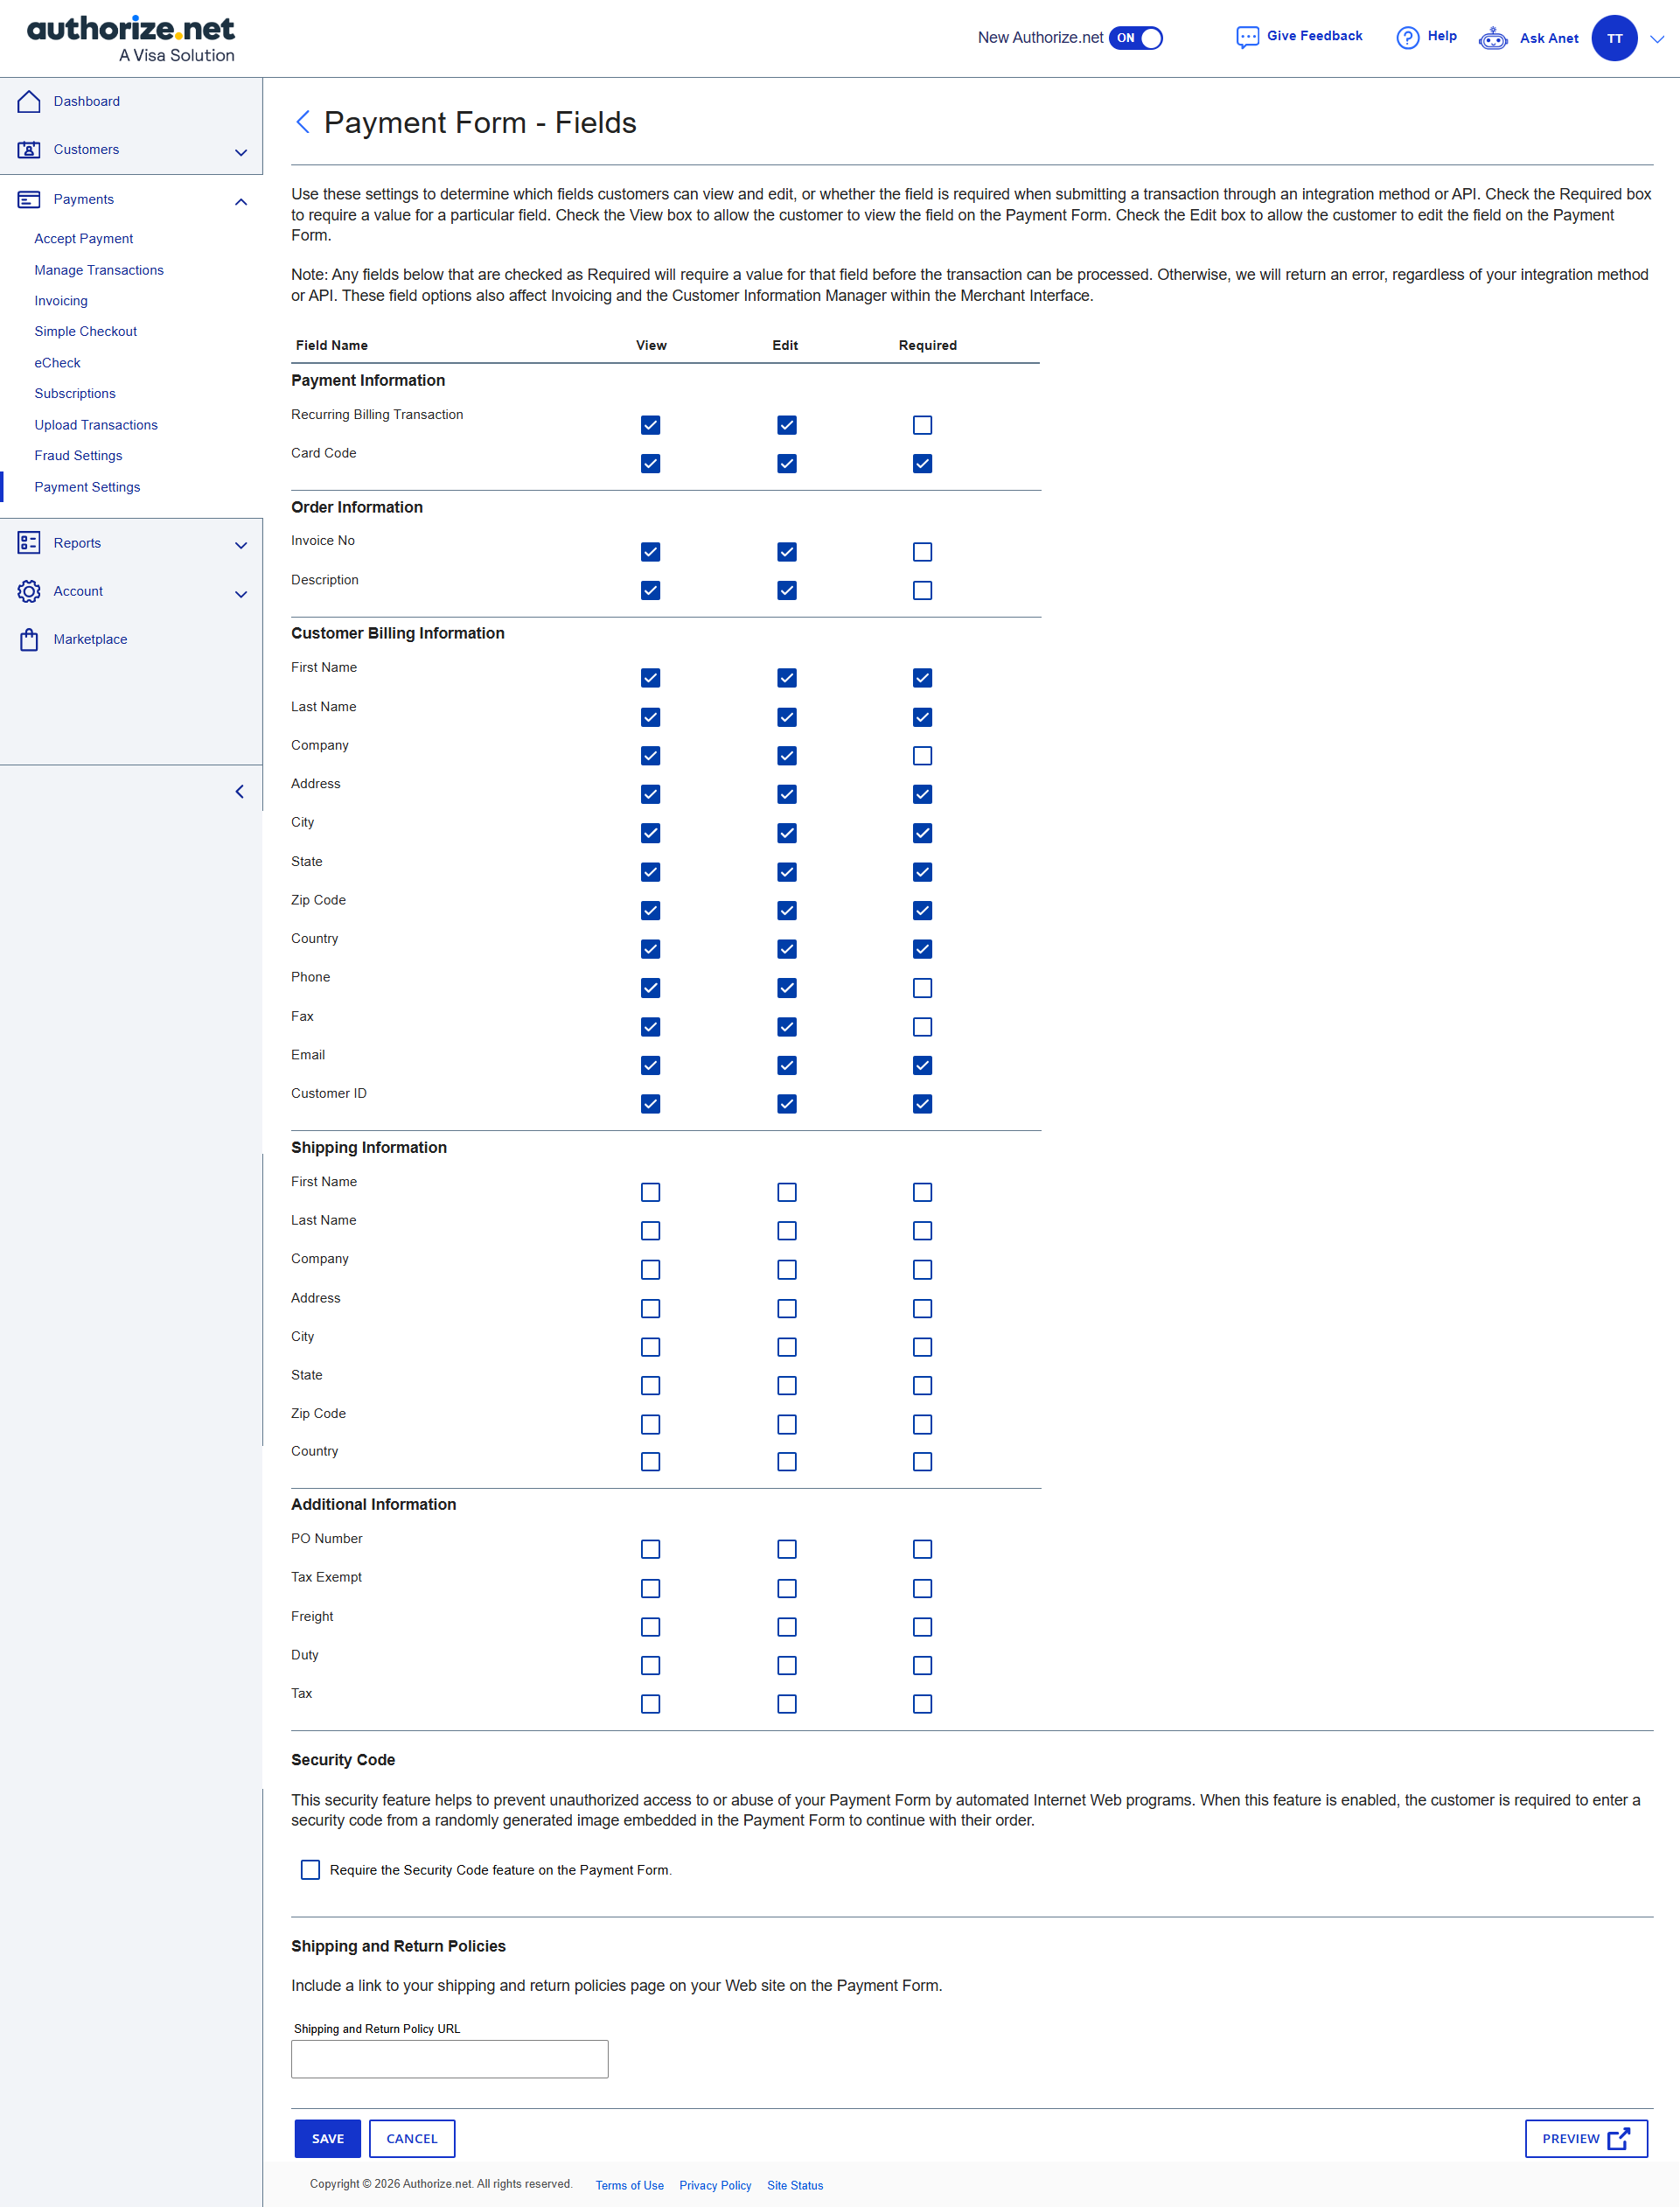
Important: The screenshot represents the approved configuration for the current TBS EasyBooking integration. Configure the fields exactly as shown. Do not independently change the Required, Optional, or other field settings.
Required Field Configuration
For the current TBS implementation:
Fields identified as Required in the approved configuration must remain configured as Required.
Fields identified as Optional in the approved configuration must remain configured as Optional.
Fields that are not used by the TBS EasyBooking payment flow must remain Optional as shown in the approved configuration.
Do not mark additional fields as Required.
Do not remove the Required setting from an approved required field.
Do not change the approved configuration unless specifically instructed by TBS Support or required by an approved product change.
The TBS application supplies the supported billing and payment information required by the current integration. Enabling additional Authorize.Net Required fields may cause the hosted payment form to request information that TBS does not supply and may result in payment validation errors.
Section |
Field |
View |
Edit |
Required |
|---|---|---|---|---|
Payment Information |
Recurring Billing Transaction |
Enabled |
Enabled |
No |
Payment Information |
Card Code |
Enabled |
Enabled |
Yes |
Order Information |
Invoice No |
Enabled |
Enabled |
No |
Order Information |
Description |
Enabled |
Enabled |
No |
Customer Billing Information |
First Name |
Enabled |
Enabled |
Yes |
Customer Billing Information |
Last Name |
Enabled |
Enabled |
Yes |
Customer Billing Information |
Company |
Enabled |
Enabled |
No |
Customer Billing Information |
Address |
Enabled |
Enabled |
Yes |
Customer Billing Information |
City |
Enabled |
Enabled |
Yes |
Customer Billing Information |
State |
Enabled |
Enabled |
Yes |
Customer Billing Information |
Zip Code |
Enabled |
Enabled |
Yes |
Customer Billing Information |
Country |
Enabled |
Enabled |
Yes |
Customer Billing Information |
Phone |
Enabled |
Enabled |
No |
Customer Billing Information |
Fax |
Enabled |
Enabled |
No |
Customer Billing Information |
Enabled |
Enabled |
Yes |
|
Customer Billing Information |
Customer ID |
Enabled |
Enabled |
Yes |
Shipping Information |
First Name |
Disabled |
Disabled |
No |
Shipping Information |
Last Name |
Disabled |
Disabled |
No |
Shipping Information |
Company |
Disabled |
Disabled |
No |
Shipping Information |
Address |
Disabled |
Disabled |
No |
Shipping Information |
City |
Disabled |
Disabled |
No |
Shipping Information |
State |
Disabled |
Disabled |
No |
Shipping Information |
Zip Code |
Disabled |
Disabled |
No |
Shipping Information |
Country |
Disabled |
Disabled |
No |
Additional Information |
PO Number |
Disabled |
Disabled |
No |
Additional Information |
Tax Exempt |
Disabled |
Disabled |
No |
Additional Information |
Freight |
Disabled |
Disabled |
No |
Additional Information |
Duty |
Disabled |
Disabled |
No |
Additional Information |
Tax |
Disabled |
Disabled |
No |
Security Code
Require the Security Code feature on the Payment Form: Disabled.
Important Configuration Rule
The Authorize.Net Payment Form – Fields settings directly affect validation of the hosted payment form. A field configured as Required may be enforced by Authorize.Net during payment processing.
Therefore:
Configure the Payment Form – Fields settings exactly according to the approved TBS configuration.
Do not enable additional Required fields.
Do not change existing Required settings.
Do not enable unsupported payment-form fields.
Do not use the screenshot as the only source for deciding whether a field should be changed; use the approved configuration documented in this section.
If a configuration change is required, obtain approval from TBS Support before changing the merchant account configuration.
Scope of Modification
The Authorize.Net Payment Form configuration is part of the approved TBS EasyBooking payment integration.
Customer Administrators should not modify these settings as part of normal setup.
Changes to Payment Form may affect:
Which fields
Authorize.Netvalidates as mandatory.Payment-form validation.
The ability of TBS to submit the required payment information.
NOTE: If a field needs to be changed from the approved configuration, contact TBS Support before making the change.
TBS Portal Configuration
The TBS Portal configuration is located in the EasyBooking KAPI configuration. Follow these steps to configure TBS Portal correctly:
Sign in to TBS Portal with an administrator account.
Navigate to Settings -> Configuration -> EasyBooking -> KAPI Config -> Authorize Gateway.
Enter the credentials for the environment you are configuring.
Set Gateway Enabled to Enabled.
Set Is Test Mode to Enabled for Sandbox/testing, or Disabled for Production/live use.
Save/update the KAPI configuration.
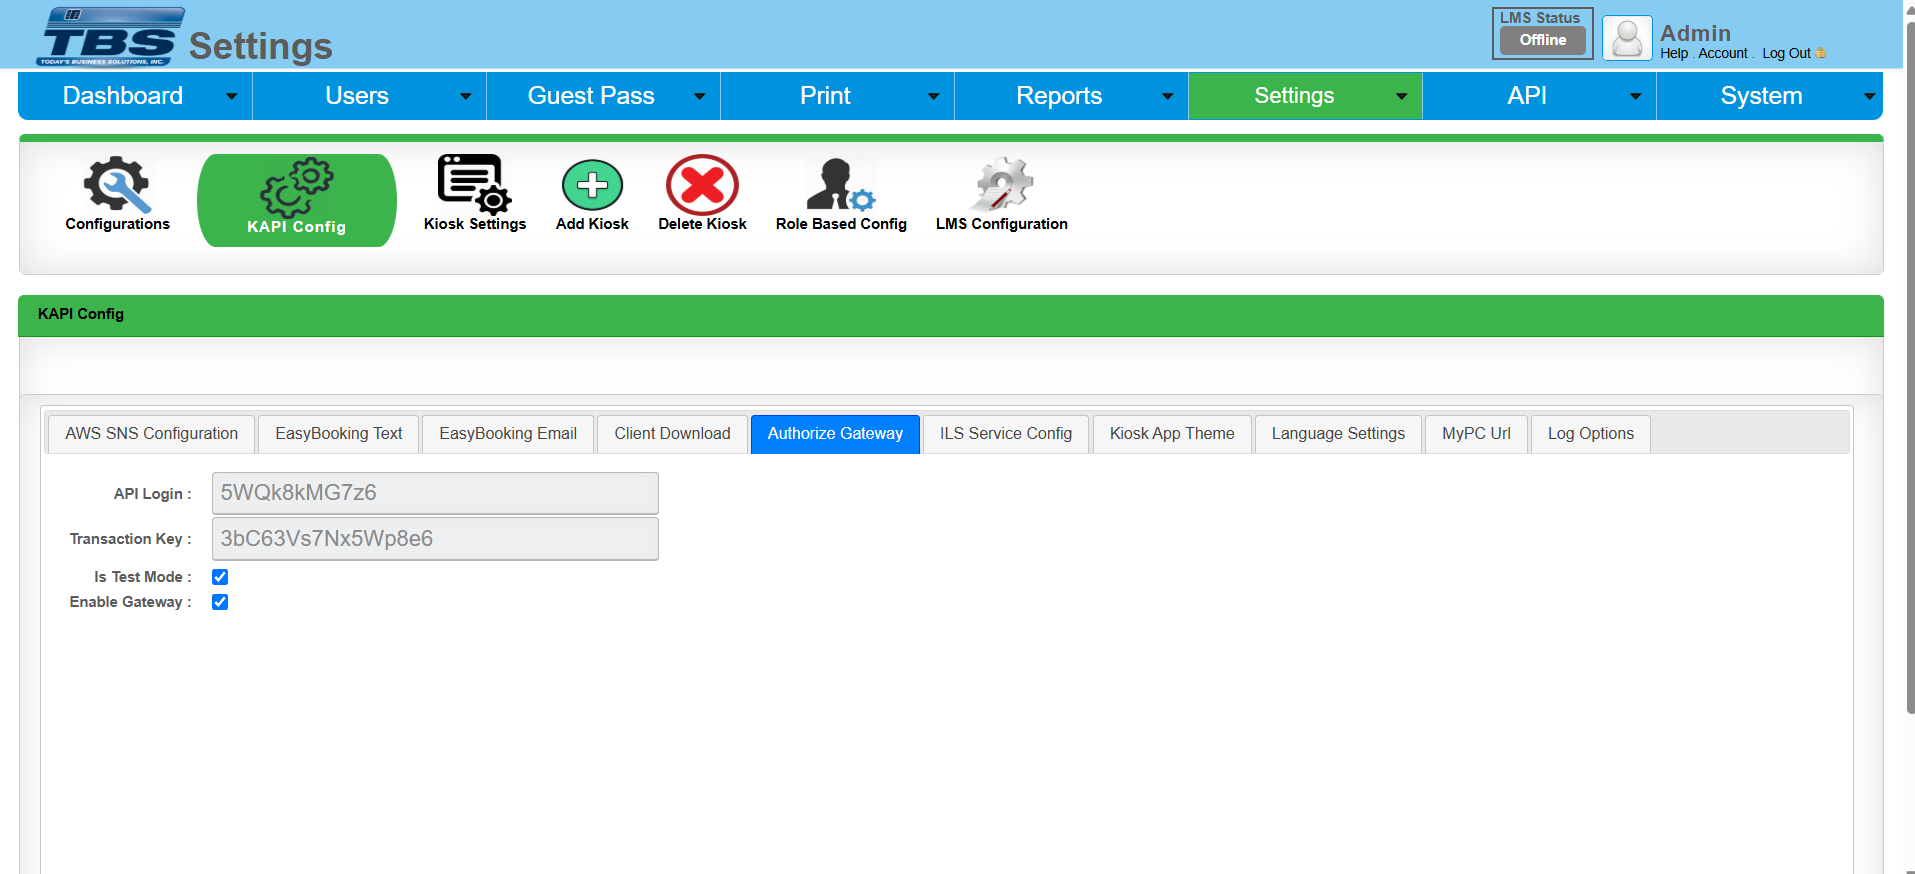
TBS Portal → Authorize Gateway Field |
Sandbox |
Production |
Required Value / Rule |
|---|---|---|---|
API Login |
Sandbox API Login ID |
Production API Login ID |
Match environment |
Transaction Key |
Sandbox Transaction Key |
Production Transaction Key |
Match environment |
Is Test Mode |
Enabled |
Disabled |
Must match environment |
Enable Gateway |
Enabled |
Enabled |
Must be enabled |
Environment matching rule: API Login ID and Transaction Key must be from the same Authorize.Net environment selected by Is Test Mode. Never use Sandbox credentials with Production mode or Production credentials with Sandbox mode. The supplied guide explicitly warns against this.
User Guide
Making a Payment
The following user-facing flow is documented based on the supplied screenshots. Use it as the expected-behavior baseline when QA or Support validates a deployment.
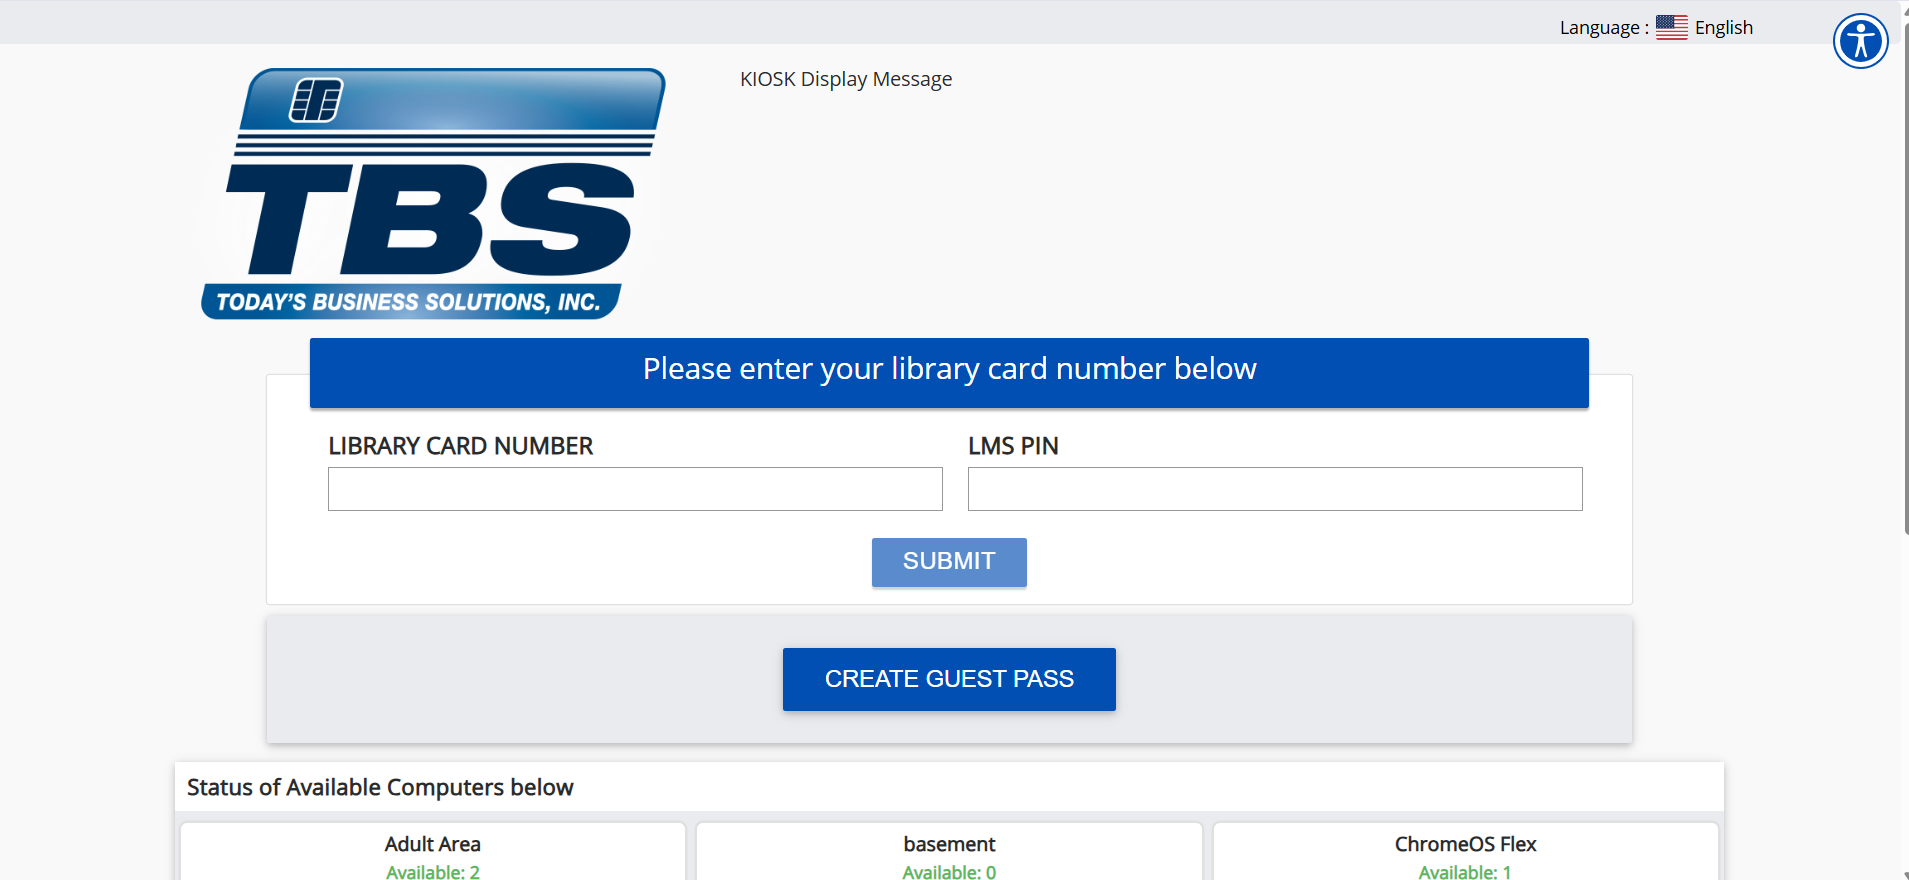
Log in to EasyBooking using a valid library card number and PIN.
Select Pay Fees/Fines.
Review the outstanding fee/fine amount and select Pay.
The Accept Hosted payment experience opens. The payment form is presented over HTTPS and contains the supported payment fields.
Enter card number, expiration date, CVV, billing information, and email.
Submit the payment or select Cancel. A successful payment returns to the EasyBooking receipt page. Cancelling the payment returns the customer to the home page.
Step 1 — Log In
Open EasyBooking.
Enter Library Card Number.
Enter PIN.
Select SUBMIT.
Step 2 — Open Fees/Fines
Click on the button “PAY FEE FINES”
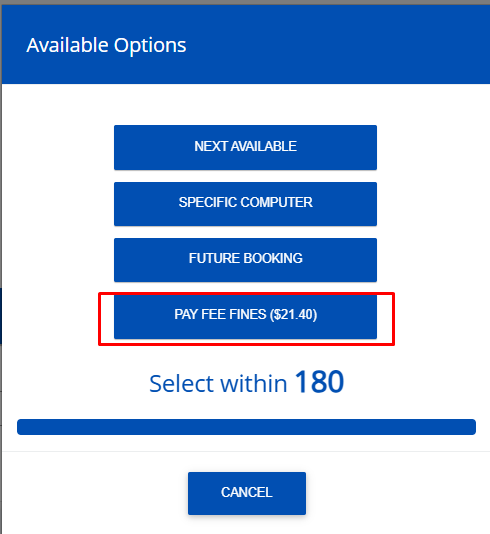
Review total amounts.
Enter or select the payment amount, where supported.
Select Pay.
-
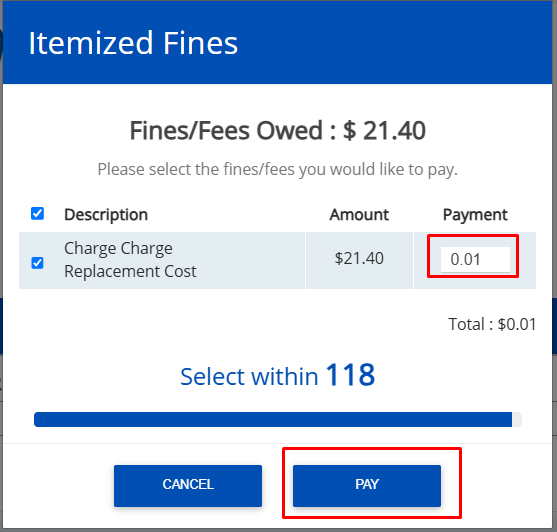
Step 3 — Enter Payment Information
After selecting Pay, the Authorize.Net Accept Hosted payment form is displayed within the EasyBooking payment experience.
Enter the payment information:
Section |
Field / Component |
Required |
UI Specification |
|---|---|---|---|
Payment |
Card Number |
Yes |
Card input with card-brand detection |
Payment |
Expiration Date |
Yes |
MM/YY format |
Payment |
Card Code / CVV |
Yes |
3–4 digit secure input |
Billing Address |
First Name |
Yes |
Text input |
Billing Address |
Last Name |
Yes |
Text input |
Billing Address |
Billing Country |
Yes |
Country dropdown |
Billing Address |
ZIP / Postal Code |
Yes |
Country-specific postal code input |
Billing Address |
Street Address |
Yes |
Text input |
Billing Address |
City |
Yes |
Text input |
Billing Address |
State |
Yes |
State/province dropdown or text input |
Billing Address |
Phone Number |
No |
Country-code phone input |
Billing Address |
Yes |
Email input with validation |
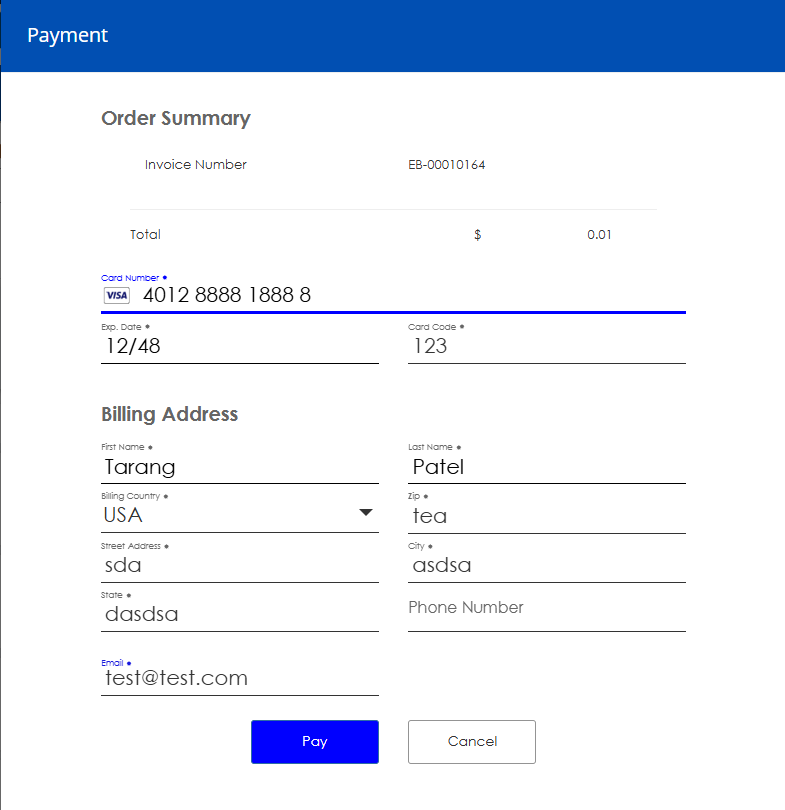
Step 4 — Submit the Payment
After entering the required information:
Review the payment information.
Select Pay or the configured payment submission button.
Wait for the payment result.
Do not refresh the browser or repeatedly submit the payment while the transaction is processing.
The payment is submitted to Authorize.Net for processing.
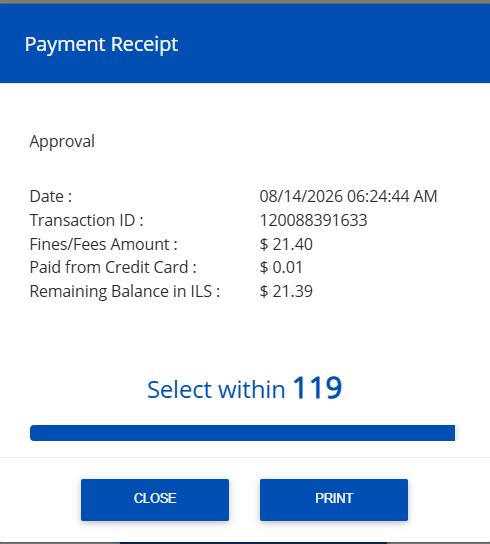
Successful Payment
Authorize.Net Result
When Authorize.Net successfully processes the transaction:
The transaction is accepted by
Authorize.Net.A successful payment result is returned.
The transaction receives a transaction ID.
The payment amount and transaction details are available in
Authorize.Net.
TBS / EasyBooking Result
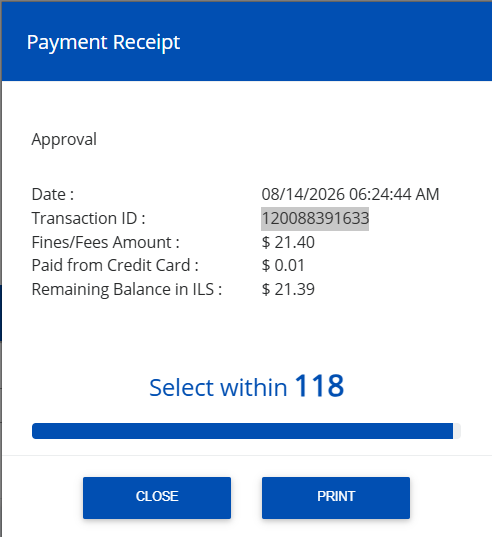
After a successful payment:
EasyBooking receives the successful payment result.
The user is returned to the EasyBooking receipt/result page
The payment is applied to the user's account.
The updated balance is displayed according to the application's payment processing.
The user can view or print the payment receipt.
The receipt should include the applicable transaction information, such as the transaction ID, payment date/time, amount paid, and applicable account/payment details.
Verify a Successful Payment
If payment verification is required by Support or QA:
Sign in to the
Authorize.NetMerchant Interface for the same environment used for the payment.Navigate to Transactions → Search/View Transaction.
Locate the transaction using the transaction date/time, amount, or transaction ID.
-
Verify the following:
Transaction ID
Transaction status
Transaction amount
Card type and last four digits
Transaction date/time
Invoice number, when applicable
Customer ID
Response code and description
The Authorize.Net transaction result and the EasyBooking/TBS result should be validated separately.
Declined Payment
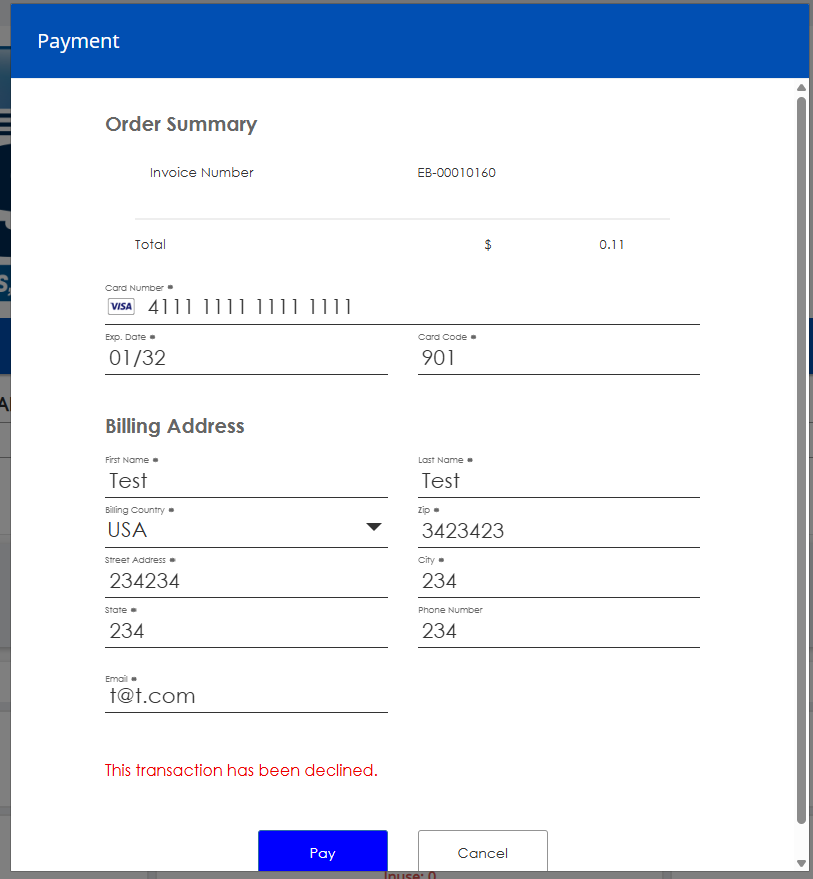
If Authorize.Net declines the transaction:
The hosted payment form displays the applicable payment error or decline result.
The transaction is not treated as a successful payment.
The payment should not be considered completed.
Common causes can include:
Insufficient funds.
Expired card.
Incorrect card information.
Incorrect billing information.
Card restrictions or a bank decline.
CVV Mismatch Example
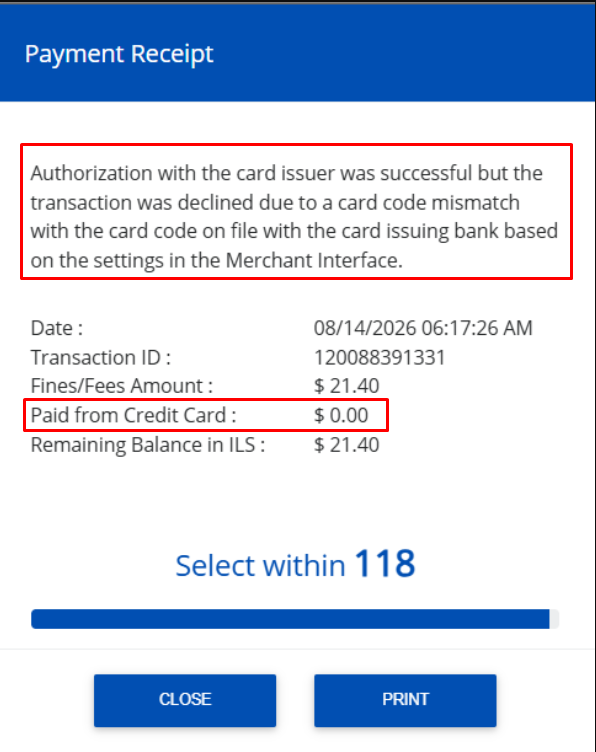
The transaction returns a CVV response of N – Does Not Match. Depending on the merchant's fraud and CVV verification configuration, this response may result in the transaction being declined.
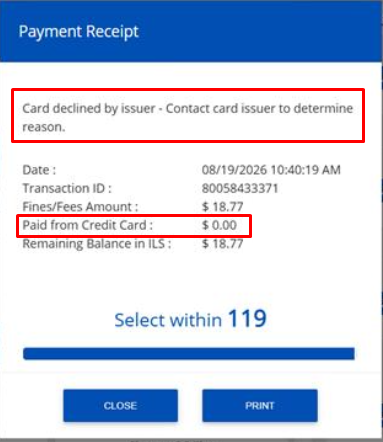
In this example, the payment receipt displays:
Transaction Status: Declined
Reason: Card declined by issuer
Paid from Credit Card:
$0.00Remaining Balance:
$18.77
This example confirms that no payment was applied to the account when the transaction was declined.
TBS / EasyBooking Result
For a declined payment:
The payment is not recorded as a successful payment by EasyBooking.
The user's outstanding fee/fines remains unchanged.
The user can correct the payment information and retry the payment.
Cancelled Payment
The customer can cancel the payment before completing the transaction by selecting Cancel or closing/leaving the payment experience, depending on the configured payment flow.
A cancelled payment does not represent a successful Authorize.Net transaction.
After cancellation:
The user is returned to the configured EasyBooking page.
The payment is not recorded as successful.
The user’s fines remains unchanged.
The user can return to the payment option and start a new payment attempt.
Payment Under Review
A payment may be displayed as Under Review when Authorize.Net fraud/security rules require additional verification.
If Authorize.Net displays an Under Review result:
The transaction requires additional processing or verification.
The final transaction status may not yet be available.
Do not assume that the payment is successful until the final transaction status is confirmed.
Do not submit the same payment again while the original transaction is Under Review unless instructed by the library or TBS Support.
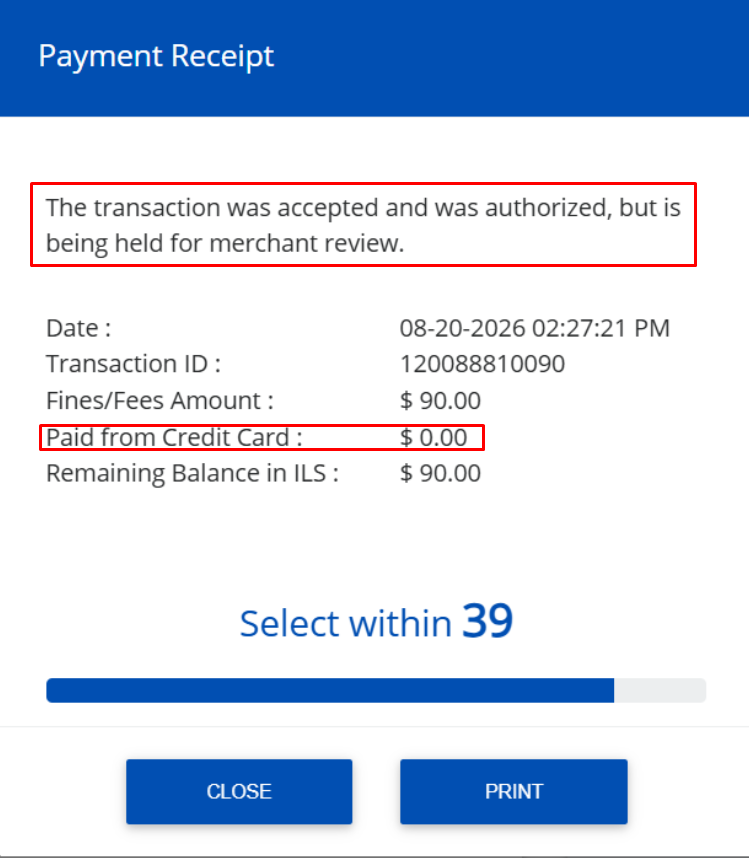
Do not submit another payment for the same amount while the original transaction is still under review unless instructed by TBS Support or the library.
Payment Result Summary
Payment Result |
|
TBS / EasyBooking Result |
Customer Action |
|---|---|---|---|
Successful |
Transaction accepted/processed |
Payment result is received and receipt/result page is displayed |
Keep the receipt for reference |
Declined |
Transaction declined |
Payment is not treated as successful; balance remains unchanged |
Correct information or use another card and retry |
Cancelled |
Payment is cancelled/not completed |
Customer returns to the configured page; no successful payment is recorded |
Start a new payment when ready |
Under Review |
Transaction requires additional verification/review |
Do not assume payment is successful until final status is confirmed |
Wait for the final result or contact the library/TBS Support |
Important Payment Rules
Always access the payment flow using a valid HTTPS public URL.
Do not refresh the payment page repeatedly while a transaction is processing.
Do not submit the same payment multiple times unless the previous attempt has clearly failed or been cancelled.
A declined payment is not a successful payment.
A cancelled payment is not a successful payment.
An Under Review result must not be assumed to be successful until the final transaction status is confirmed.
Keep the payment receipt and transaction ID for reference when a payment is successful.
If the payment result is unclear, verify the transaction status in the
Authorize.NetMerchant Interface before attempting another payment.
Internal Validation — Sandbox Only
Critical Sandbox rule: The supplied guide states that the Sandbox merchant account should be in Live Mode for transaction testing. Transactions submitted while the Authorize.Net account itself is in Test Mode are not stored and return transaction ID 0.
Scenario |
Test Data |
Expected Result |
|---|---|---|
Approved – Visa |
|
Transaction approved |
Approved – Mastercard |
|
Transaction approved |
Approved – Amex |
|
Transaction approved |
Approved – Discover |
|
Transaction approved |
General Decline |
Any supported test card + ZIP |
Transaction declined |
CVV Match |
CVV |
CVV response |
CVV Mismatch |
CVV |
CVV response |
For Sandbox card testing, use an expiration date after today's date. For Visa, Mastercard, Discover and other supported three-digit-code cards, any three-digit CVV can be used unless a specific CVV response is being tested. American Express uses a four-digit code.
Note: The AVS test values should be documented as ZIP-code triggers, rather than using arbitrary addresses such as
1234 Main Stand999 Error Ln.Authorize.Net's current Sandbox guide defines specific ZIP codes to generate AVS responses.
Required functional test cases
Test Case |
Steps |
Expected Result |
|---|---|---|
Approved Payment |
Start payment → Enter approved test card → Submit |
Payment succeeds and TBS processes the successful transaction |
Declined Payment |
Use approved test card + ZIP |
Decline is displayed in Accept Hosted; payment is not treated as successful |
CVV Failure |
Use CVV |
CVV mismatch response is generated and the transaction is handled according to the merchant's configured fraud rules |
Invalid Card |
Enter an invalid card number |
Accept Hosted validates the input and prevents successful payment |
Expired Card |
Enter an expired card date |
Payment is rejected/validation error is displayed |
Retry After Decline |
Trigger a decline → Correct card/billing information → Submit again |
Customer can retry from the hosted payment form and successfully complete payment |
Cancel Payment |
Start payment → Click Cancel |
Customer is returned to the configured |
Iframe Mode |
Open Accept Hosted in iframe → Complete payment |
Hosted payment form operates within the iframe |
Receipt |
Complete successful payment |
Expected receipt/return behavior is displayed according to the configured Accept Hosted settings |
Browser Refresh |
Complete payment → Refresh/return to result page |
No duplicate payment is created by the TBS application |
Authorize.Net specifically documents that, after a payment decline or error, the Accept Hosted form remains available so the customer can correct the information and retry.
Payment Lifecycle Guide
The payment process allows users to review outstanding fines, select the amount to pay, securely enter their card information, and receive the appropriate payment outcome.
Payment Process
-
View Your Fines
Review the outstanding fines associated with your account.
-
Select Amount to Pay
Select the amount you want to pay.
-
Secure Payment Page Opens
The secure payment page provided by
Authorize.Netopens within the payment experience.Payment information is entered directly on the secure payment page.
-
Enter Card Information
Enter the required payment and billing information.
-
Submit Payment
Submit the payment for processing.
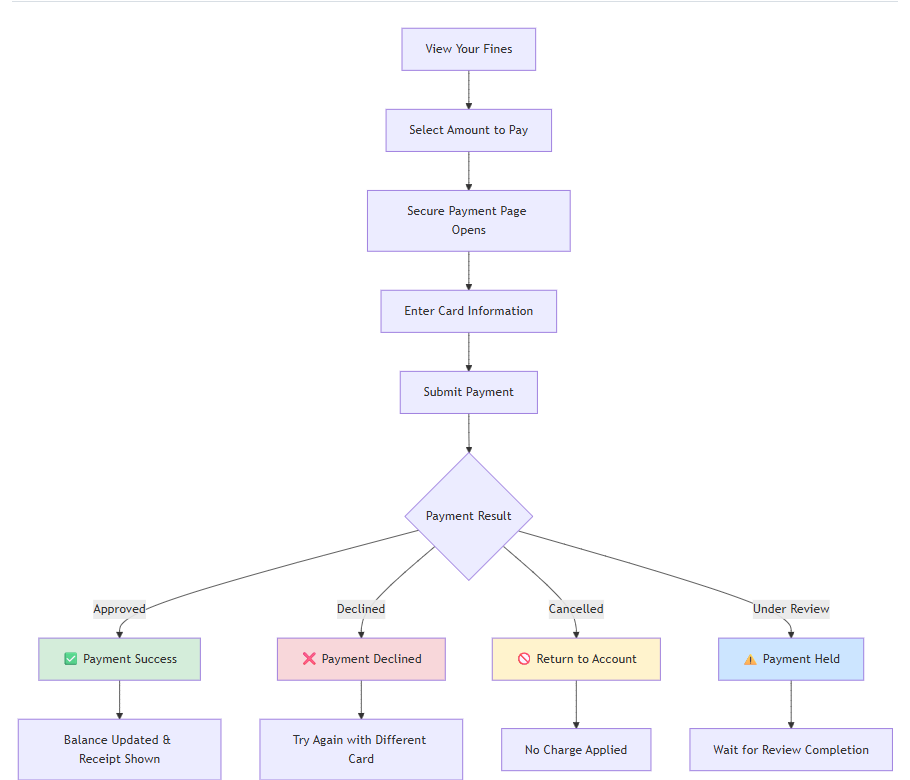
What Happens After You Pay?
After you submit your payment through Authorize.Net, the payment result is checked to determine the appropriate next step.
Payment Result Handling
Result |
What Happens |
Next Step |
|---|---|---|
Success |
The payment is successfully processed. |
The payment is applied to your account and the receipt is displayed. |
Declined |
The transaction is declined and is not recorded as a successful payment. |
An error is displayed and you can retry the payment. |
Cancelled |
The payment process is cancelled by the user. |
You are returned to your account. No further action is required. |
Under Review |
The payment requires additional verification. |
The payment is held for verification, and you are notified to wait for the review to complete. |
Success
If your payment is successful:
The payment is applied to your account.
Your account balance is updated.
A payment receipt is displayed.
Declined
If your payment is declined:
No charge is made to your card.
An error message is displayed.
You can retry the payment using another card or payment method.
Cancelled
If you cancel the payment:
You are returned to your account.
No charge is made.
No further action is required.
Under Review
If the payment is placed under review:
The payment is held for verification.
You are notified that the payment requires review.
Wait for the verification process to complete before taking further action.
Security & Privacy
Your Information is Protected

What We Keep:
Transaction ID
Payment amount
Date and time
Receipt information
What We DON'T Keep:
Full card numbers
CVV codes
Card expiration dates
Your billing address
QA : Troubleshooting and Failure Isolation
Use the following troubleshooting guide to identify whether an issue is related to the TBS environment, TBS Portal configuration, or Authorize.Net configuration.
Symptom |
Most Likely Configuration Area |
Check First |
|---|---|---|
Payment form does not open |
TBS environment / HTTPS / Accept Hosted configuration |
Confirm that TBS is accessed using a valid public HTTPS URL. Verify that TBS Portal → |
Authentication or credential error |
TBS Portal API credentials |
Confirm that the API Login ID and Transaction Key belong to the same |
Hosted payment form rejects a field as required |
|
Verify the Payment Form – Fields configuration against the approved TBS configuration. The following fields must be Required: Card Code, First Name, Last Name, Address, City, State, Zip Code, Country, Email, and Customer ID. Do not mark any additional fields as Required. |
Transaction ID is 0 or TEST-during Sandbox testing |
|
Confirm that the merchant account has enabled Transaction Processing. If it is disabled, enable transaction processing to receive actual transaction numbers. Note: this is not the same as the TBS Portal’s Authorize configuration section’s Test mode = True. |
|
|
Check the transaction in the |
|
Integrated Library System payment result handling |
First confirm the transaction is successful in |
Duplicate payment is suspected after a browser refresh |
TBS payment result handling |
Verify the transaction in |
Payment fails when testing on localhost or 127.0.0.1 |
TBS environment URL |
Use a valid public HTTPS-accessible TBS environment. |
Payment is shown as Under Review |
|
Verify the transaction status in the |
QA Result Isolation
When investigating a payment issue, separate the verification into the following two areas:
Authorize.Net verification
Hosted payment form opened successfully.
Required fields were accepted.
Transaction was submitted.
Transaction ID was generated.
Transaction status is correct.
Response code and description are correct.
AVS/CVV results are as expected.
TBS / ILS verification
Payment result was received by Integrated Library System.
Transaction was associated with the correct customer/account.
Customer balance was updated when applicable.
Receipt/result page was displayed correctly.
No duplicate payment was created.
TBS Test-xxxxx Transaction Reference
When Authorize Merchant account has disabled transaction processing, we will not receive any transaction id and it may return 0. Following configuration needs to be checked first:
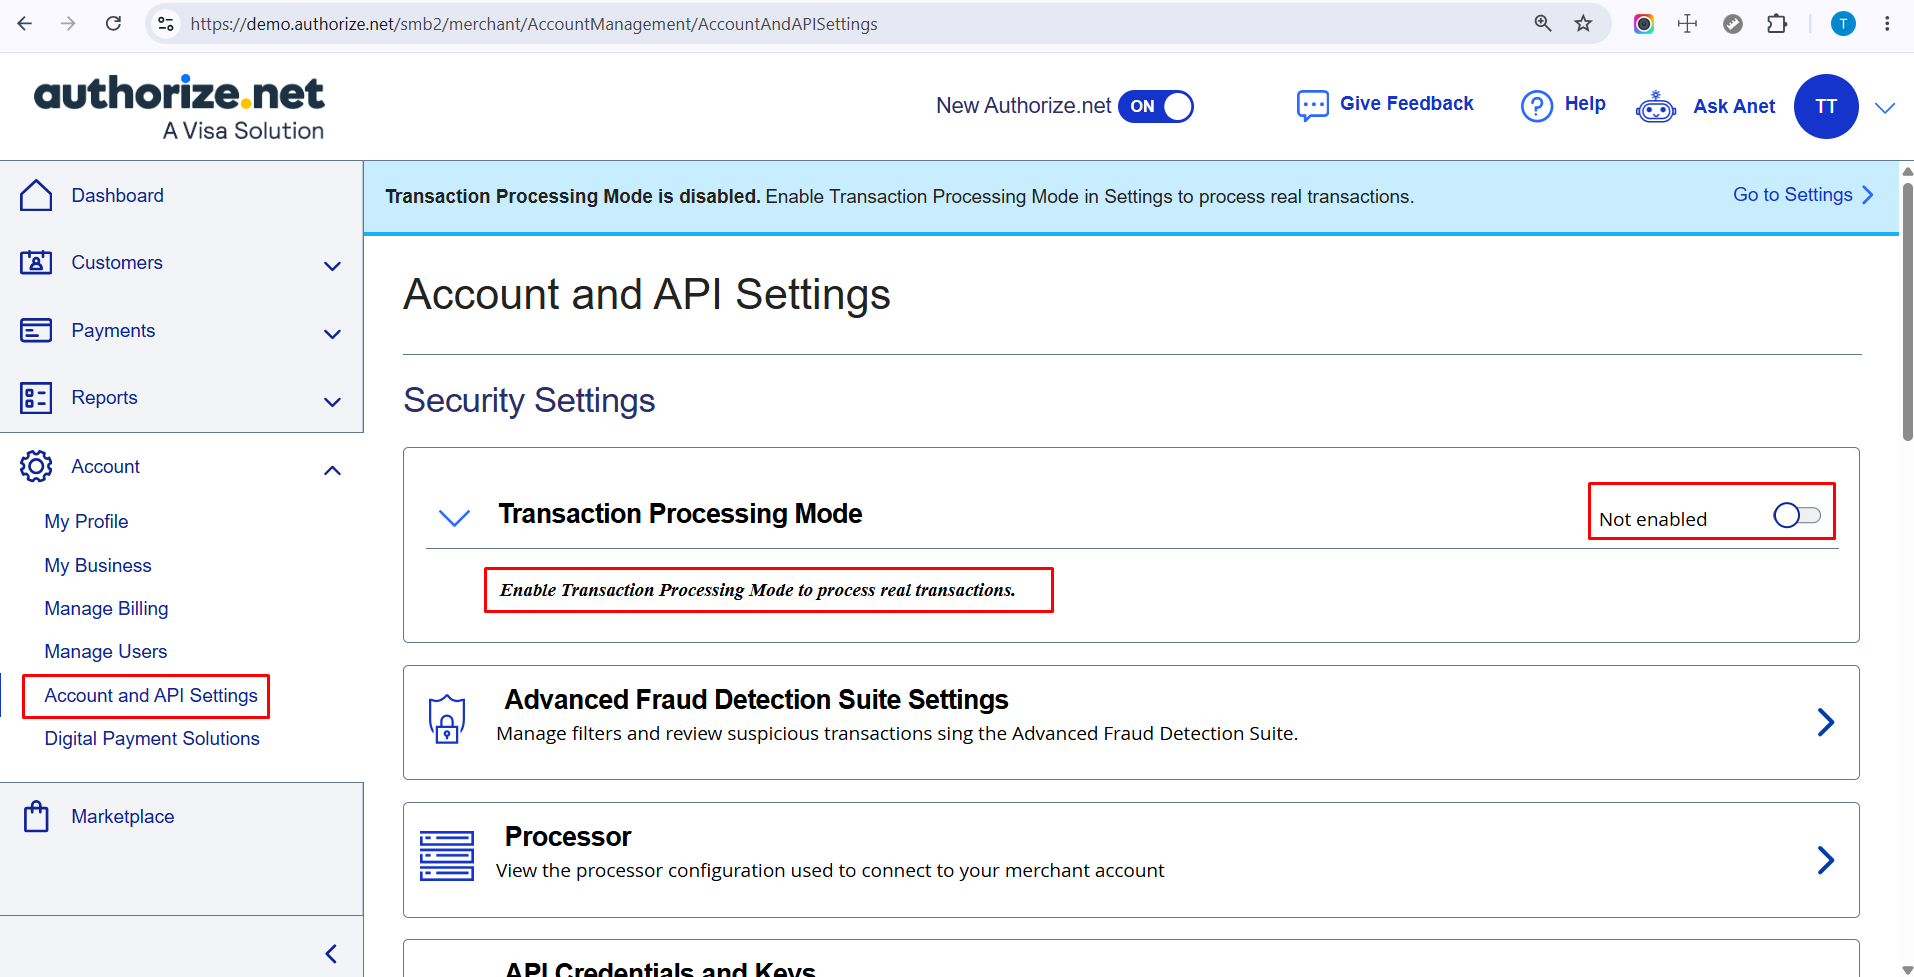
When the Authorize.Net Sandbox account is operating in Test Mode and returns a transaction ID of 0, EasyBooking generates a unique Test Mode transaction reference so that the payment process can continue and the transaction can be tracked internally.
Before troubleshooting this scenario, verify that the Authorize.Net merchant account is configured correctly and that transaction processing is enabled as expected.
Test Mode Transaction Reference
When the Sandbox account is operating in Test Mode and Authorize.Net returns transaction ID 0, EasyBooking generates a Test Mode transaction ID using the following format:
TEST-{trimmed invoice number}
For example, if the invoice number is:
00012345
the generated Test Mode transaction ID is:
TEST-12345
The invoice number is trimmed before the TEST- prefix is added.
The generated Test Mode transaction ID is stored in the TBS Portal database for internal tracking and review. It distinguishes Test Mode transactions from real transactions and is not displayed anywhere in the user-facing interface.
Important: Two separate test-mode settings are involved
TBS Portal → Is Test Mode: Enable this when connecting TBS Portal to the
Authorize.NetSandbox.Authorize.NetMerchant Interface → Test Mode: For transaction testing, use the Sandbox merchant account in the mode required for transactions to be persisted and assigned a transaction ID.
These settings are independent and should not be treated as the same setting.
Test Scenarios
Refer to user payment scenarios for success, denied, canceled, and under review.
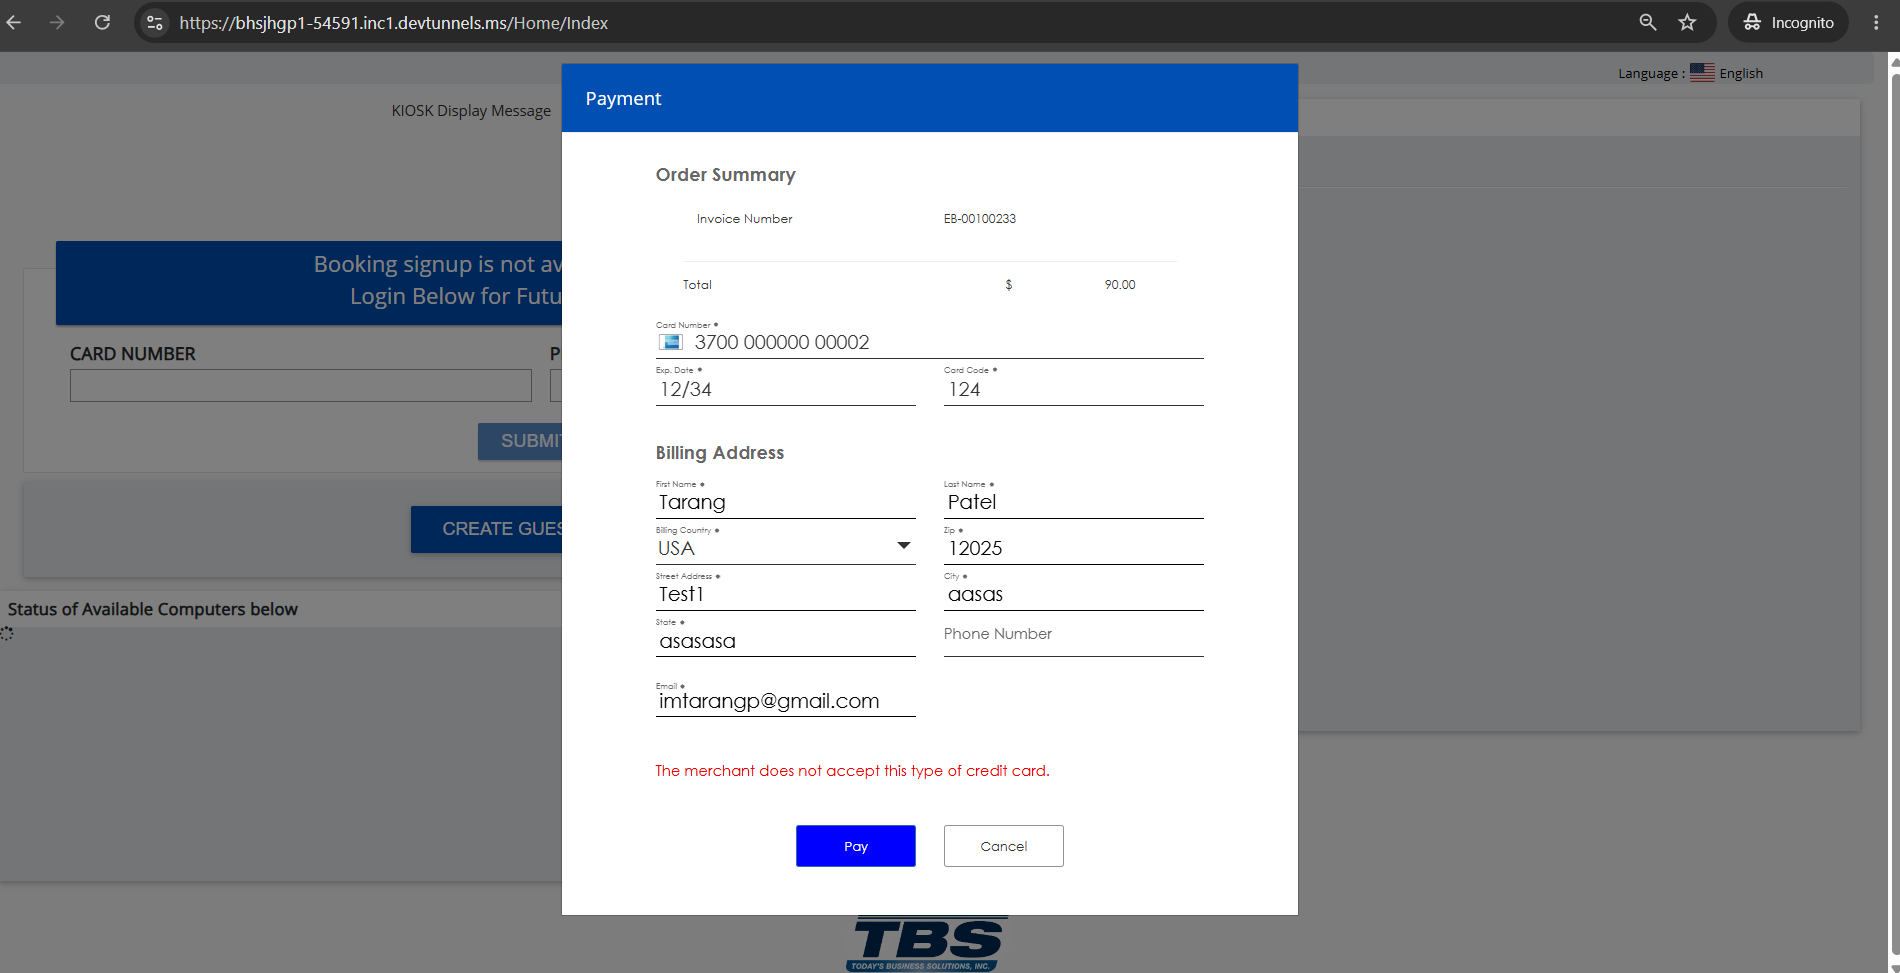
If a merchant accepts only certain card types and a customer tries to pay with an unsupported card—for example, if the merchant accepts only Mastercard but the customer uses American Express—the payment form displays an error message.
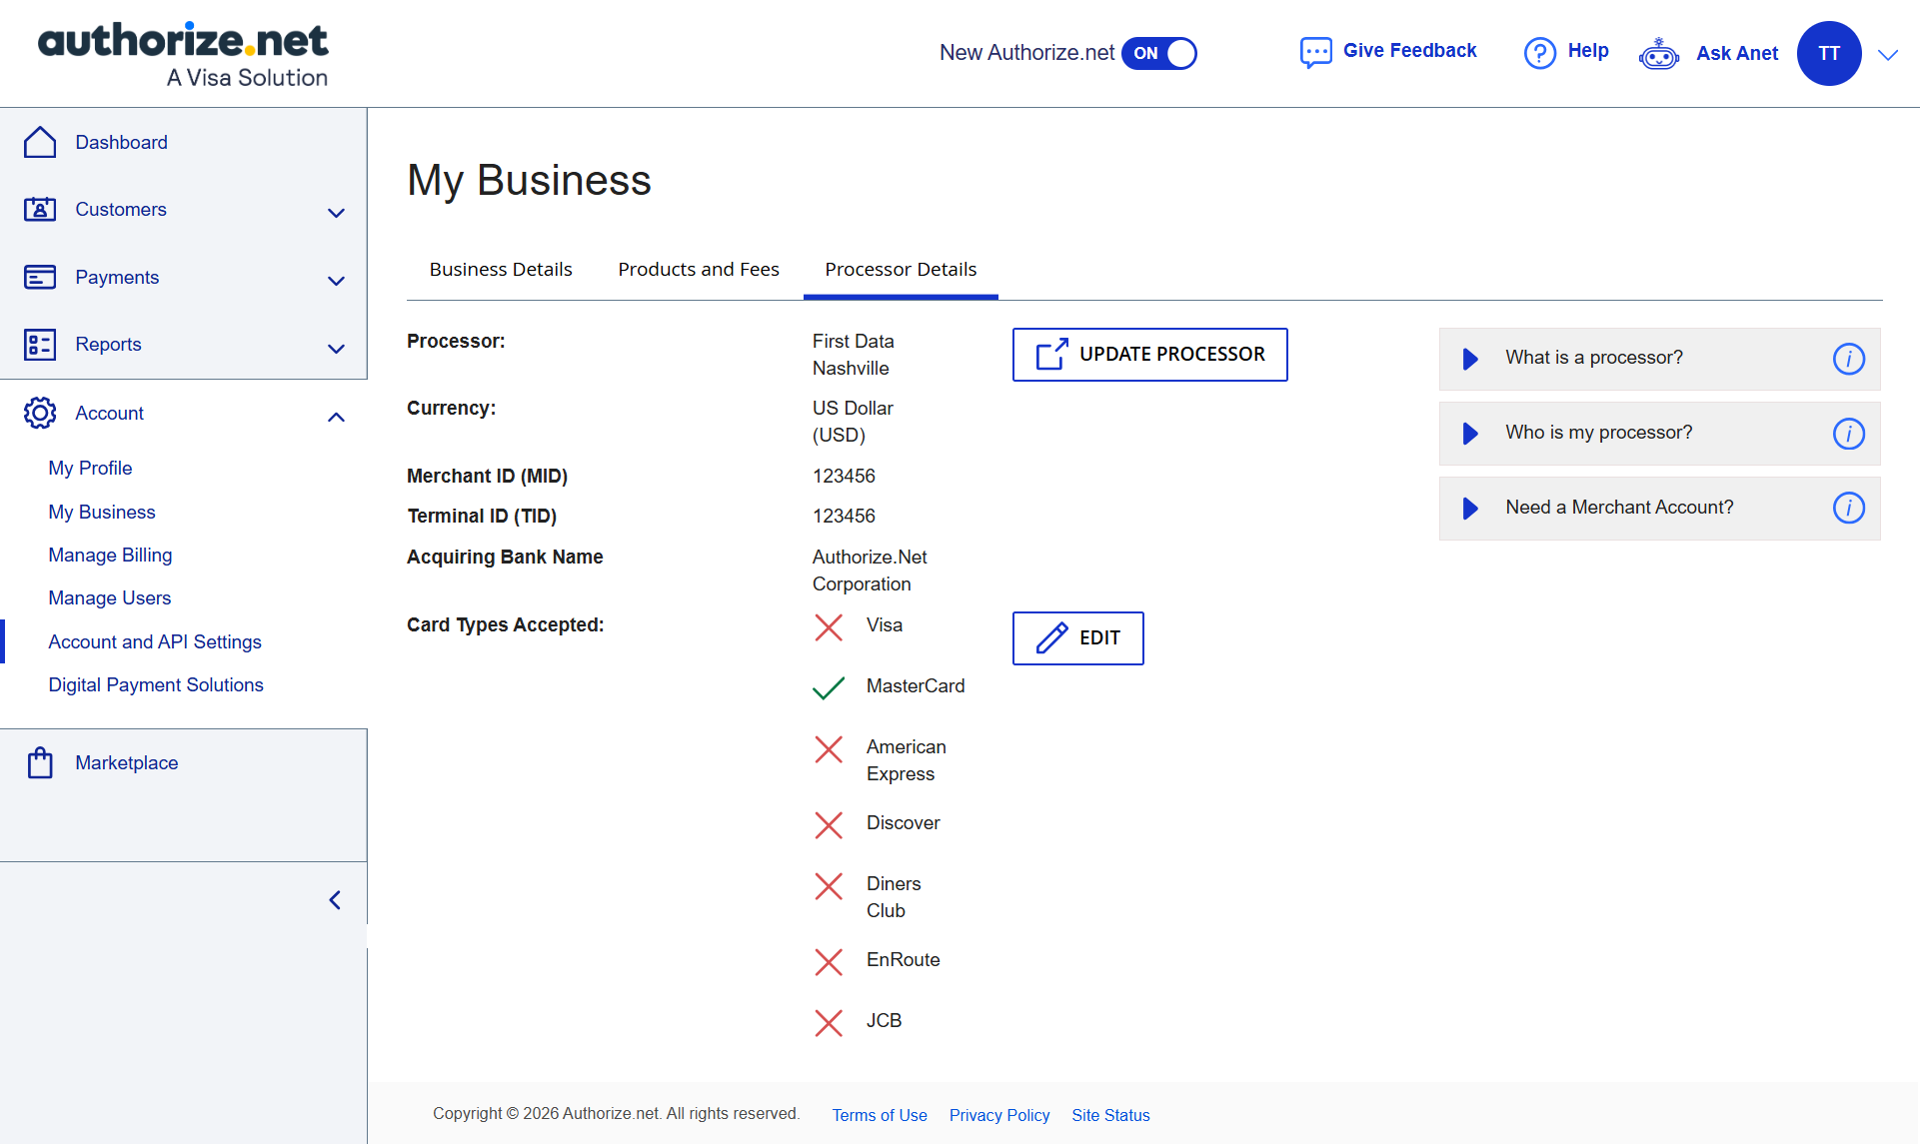
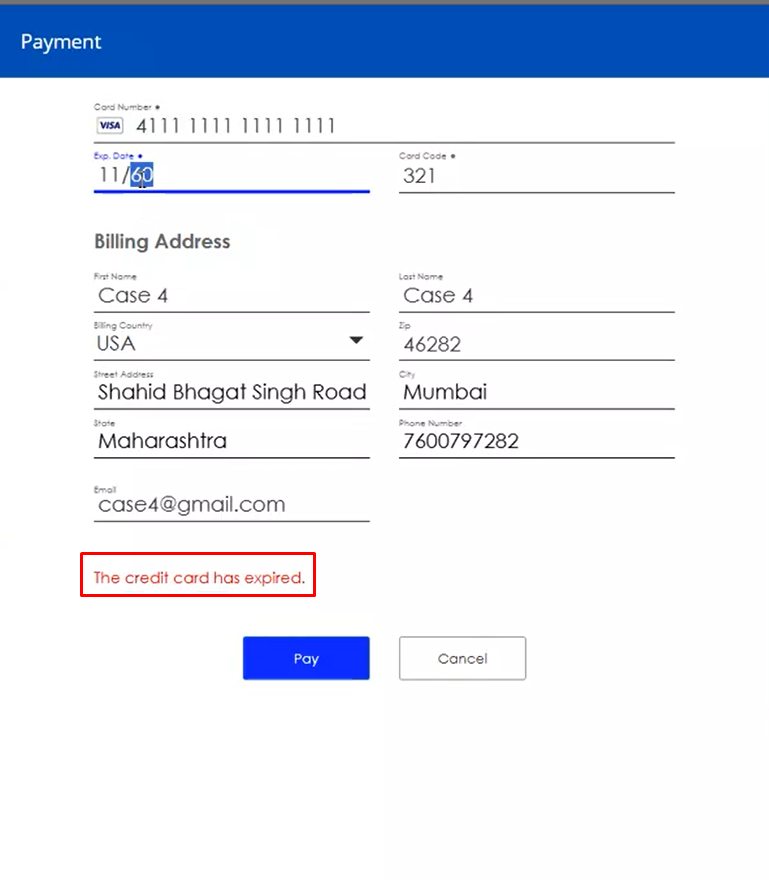
Expired Credit Card
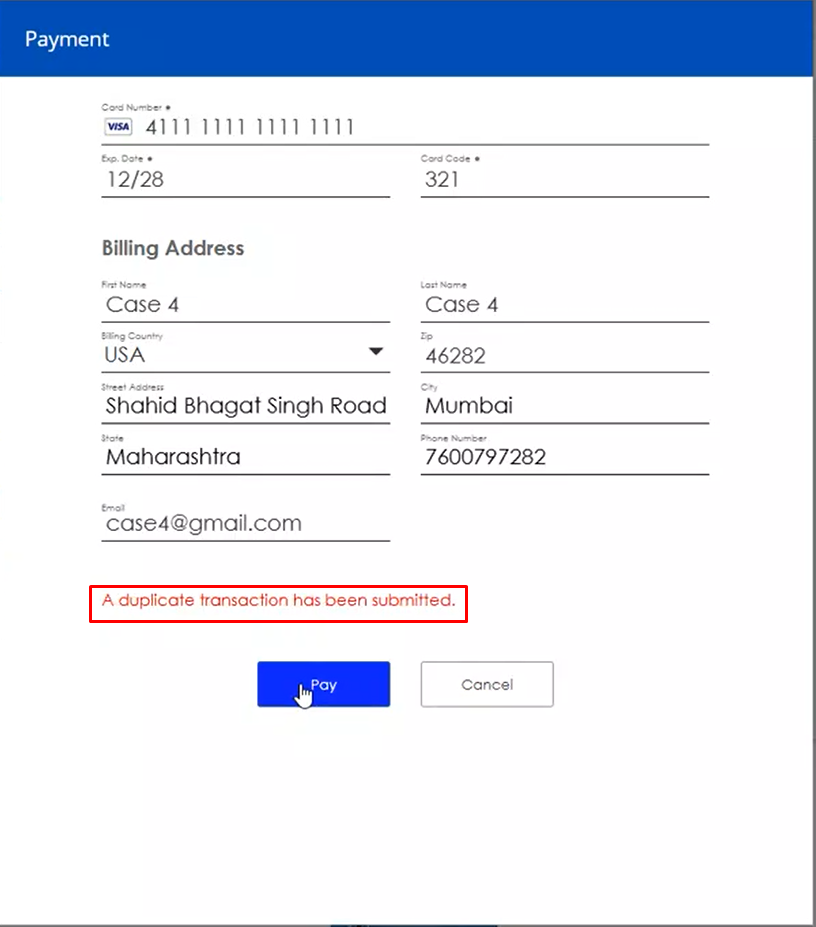
Duplicate Transaction Submitted
Once a transaction has been submitted to Authorize.Net and a response has been recorded (for example, Declined, Held, AVS/Fraud Review, or another status), the user cannot submit the same transaction again within the same session.
For example, In the current TBS Accept Hosted flow, attempting to resubmit the same transaction within the same payment session may result in Authorize.Net returning “A duplicate transaction has been submitted.”
To make another payment attempt, the user must restart the payment process from the beginning.
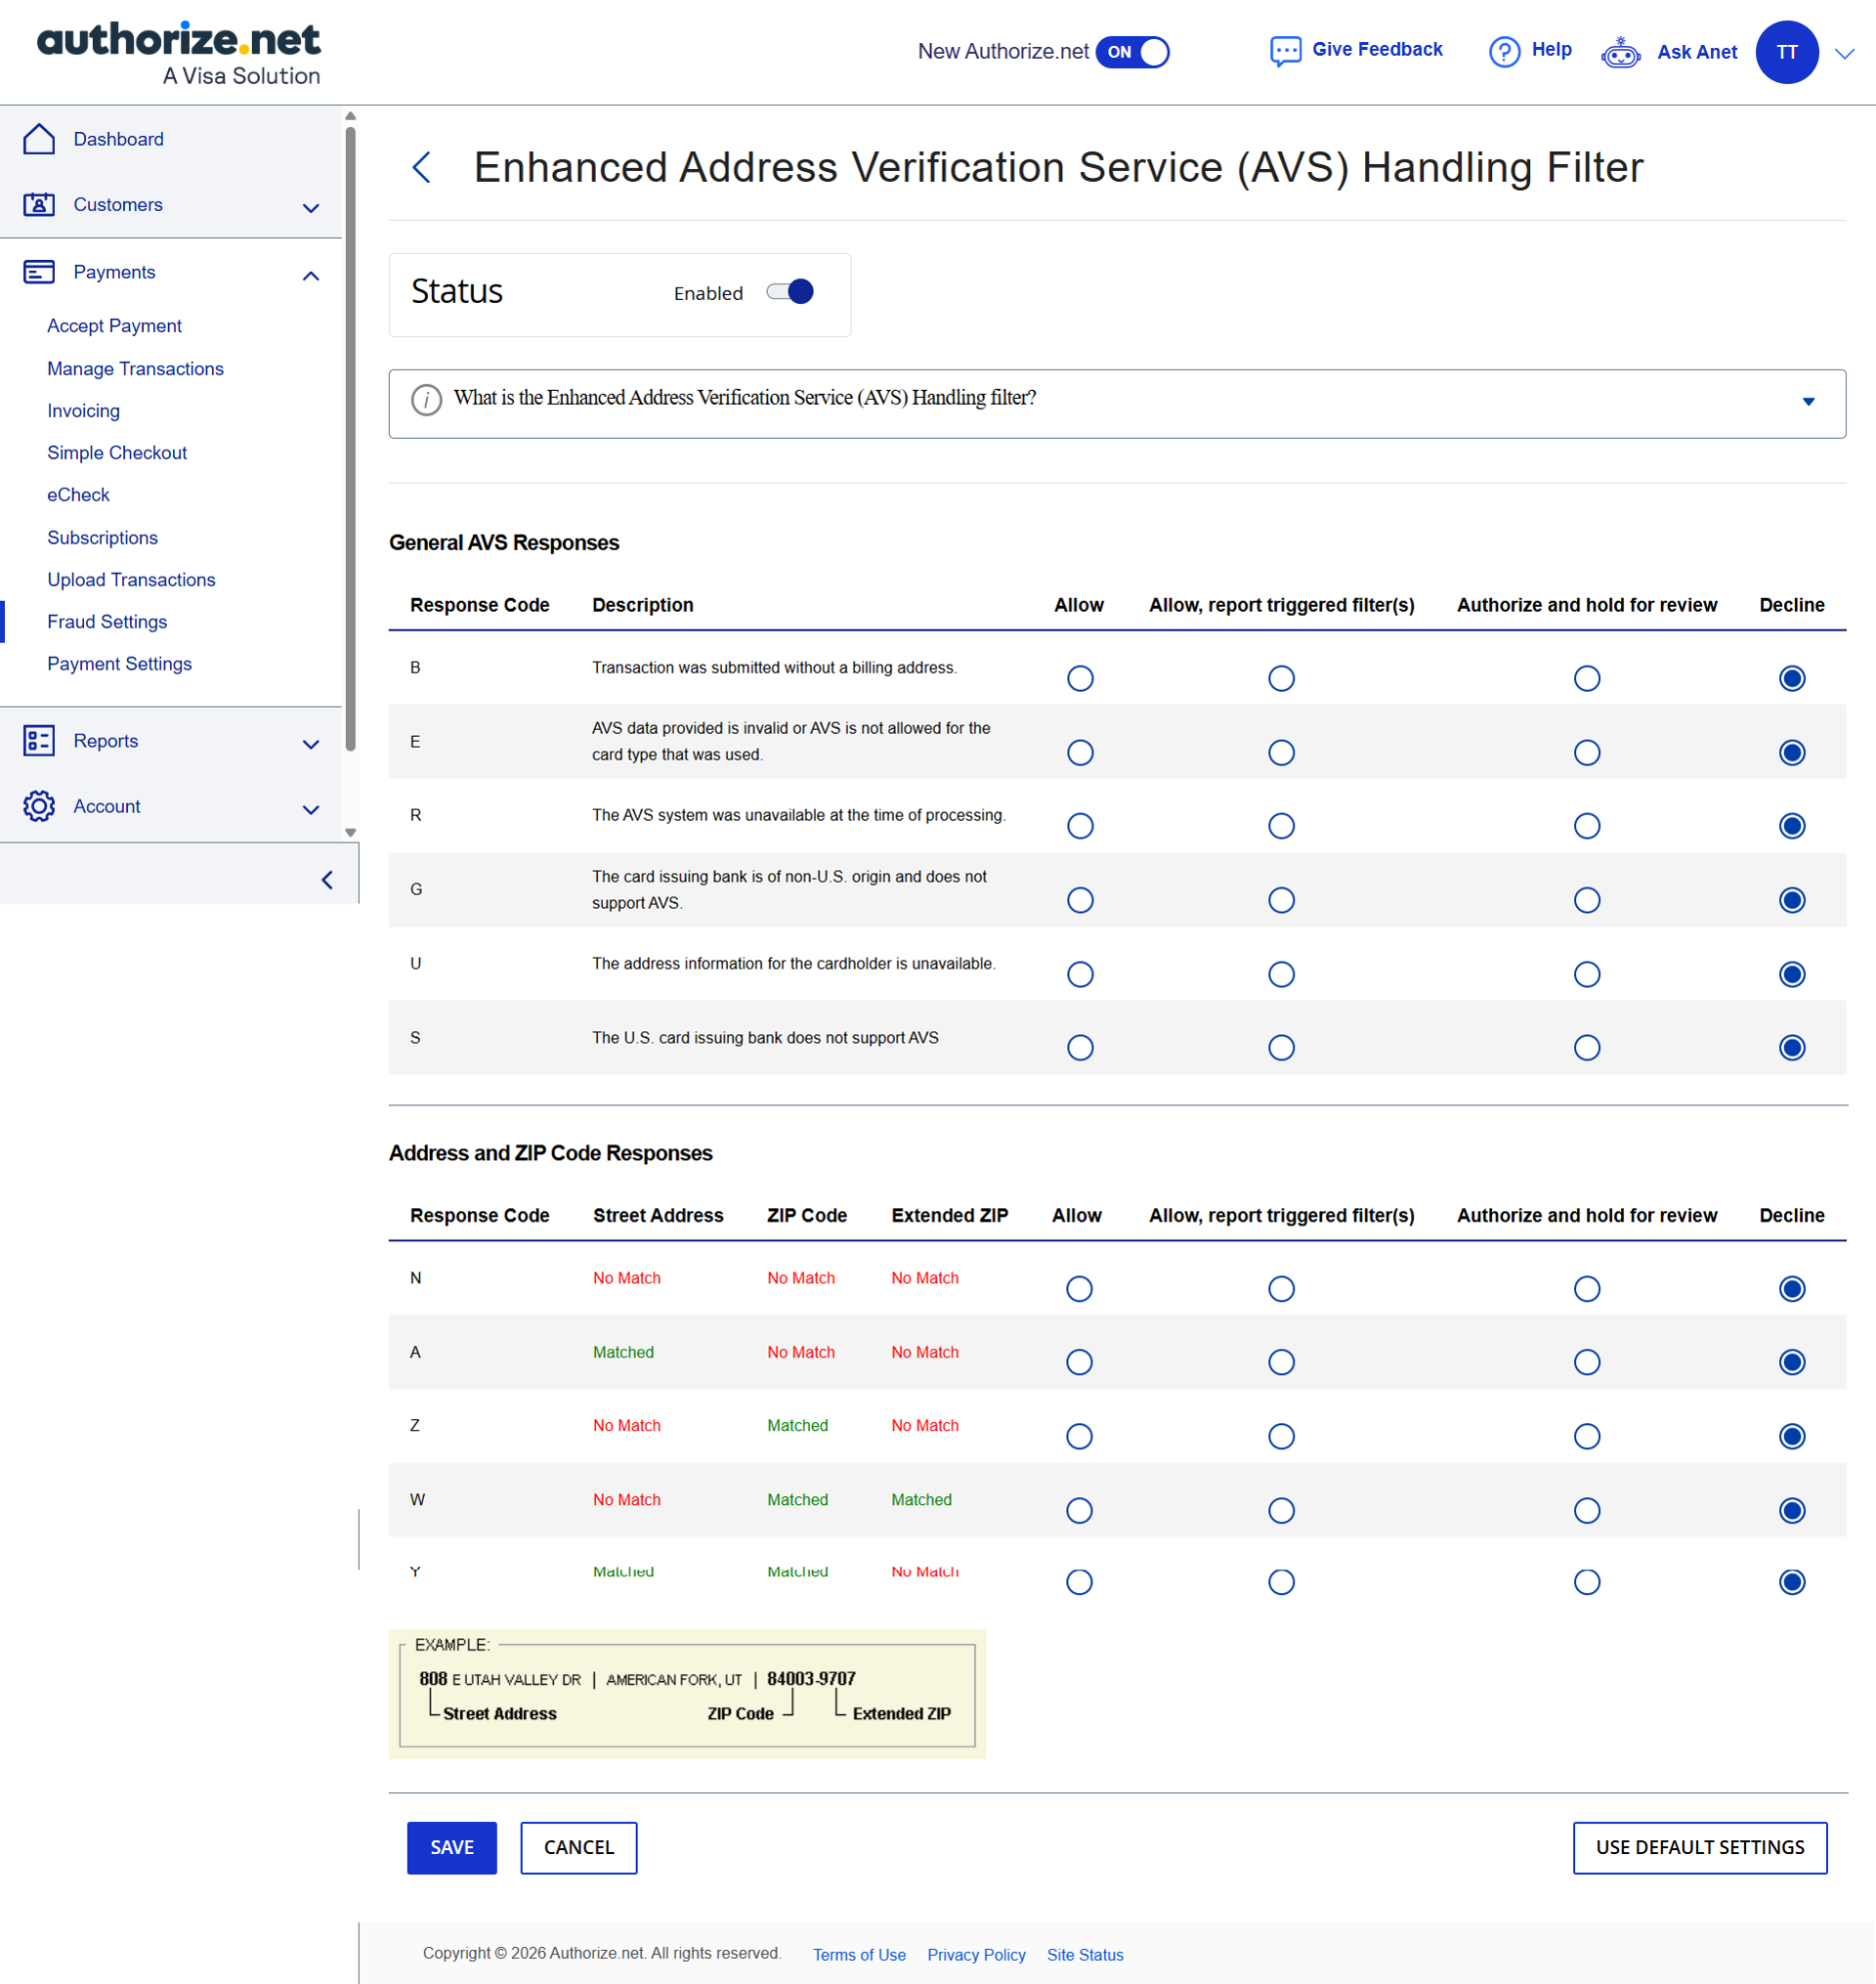
AVS Mismatch
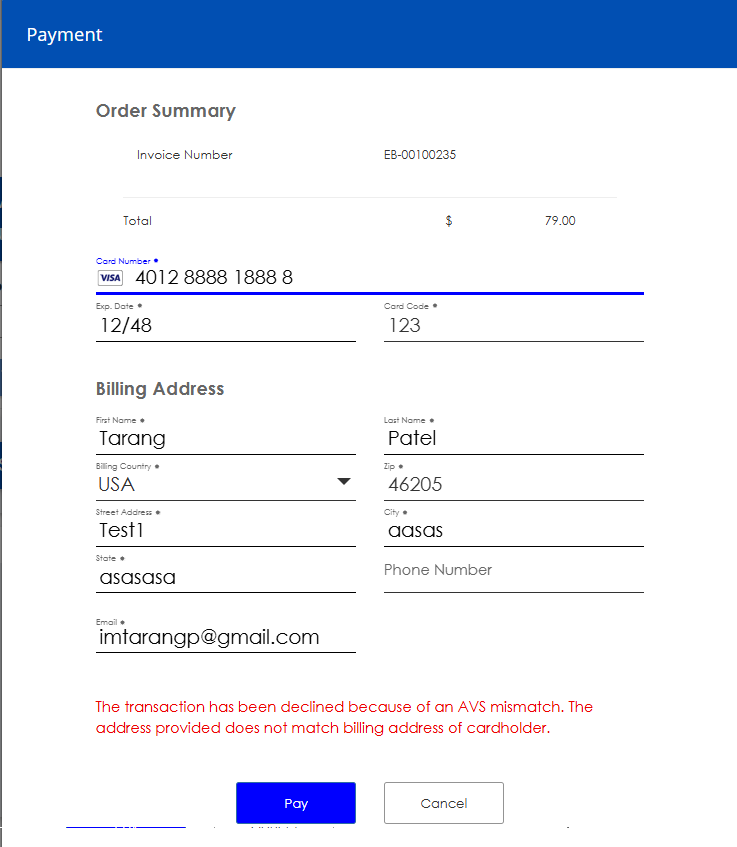
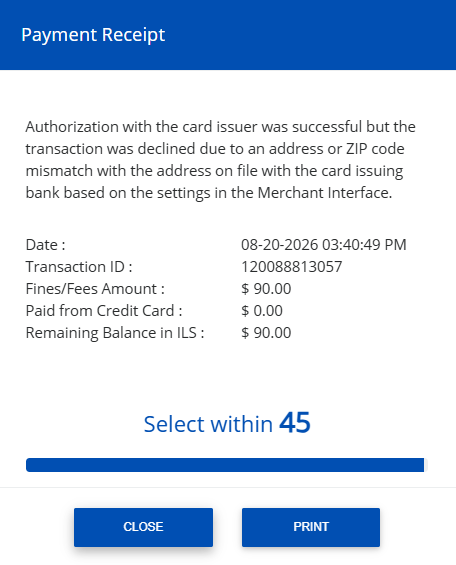
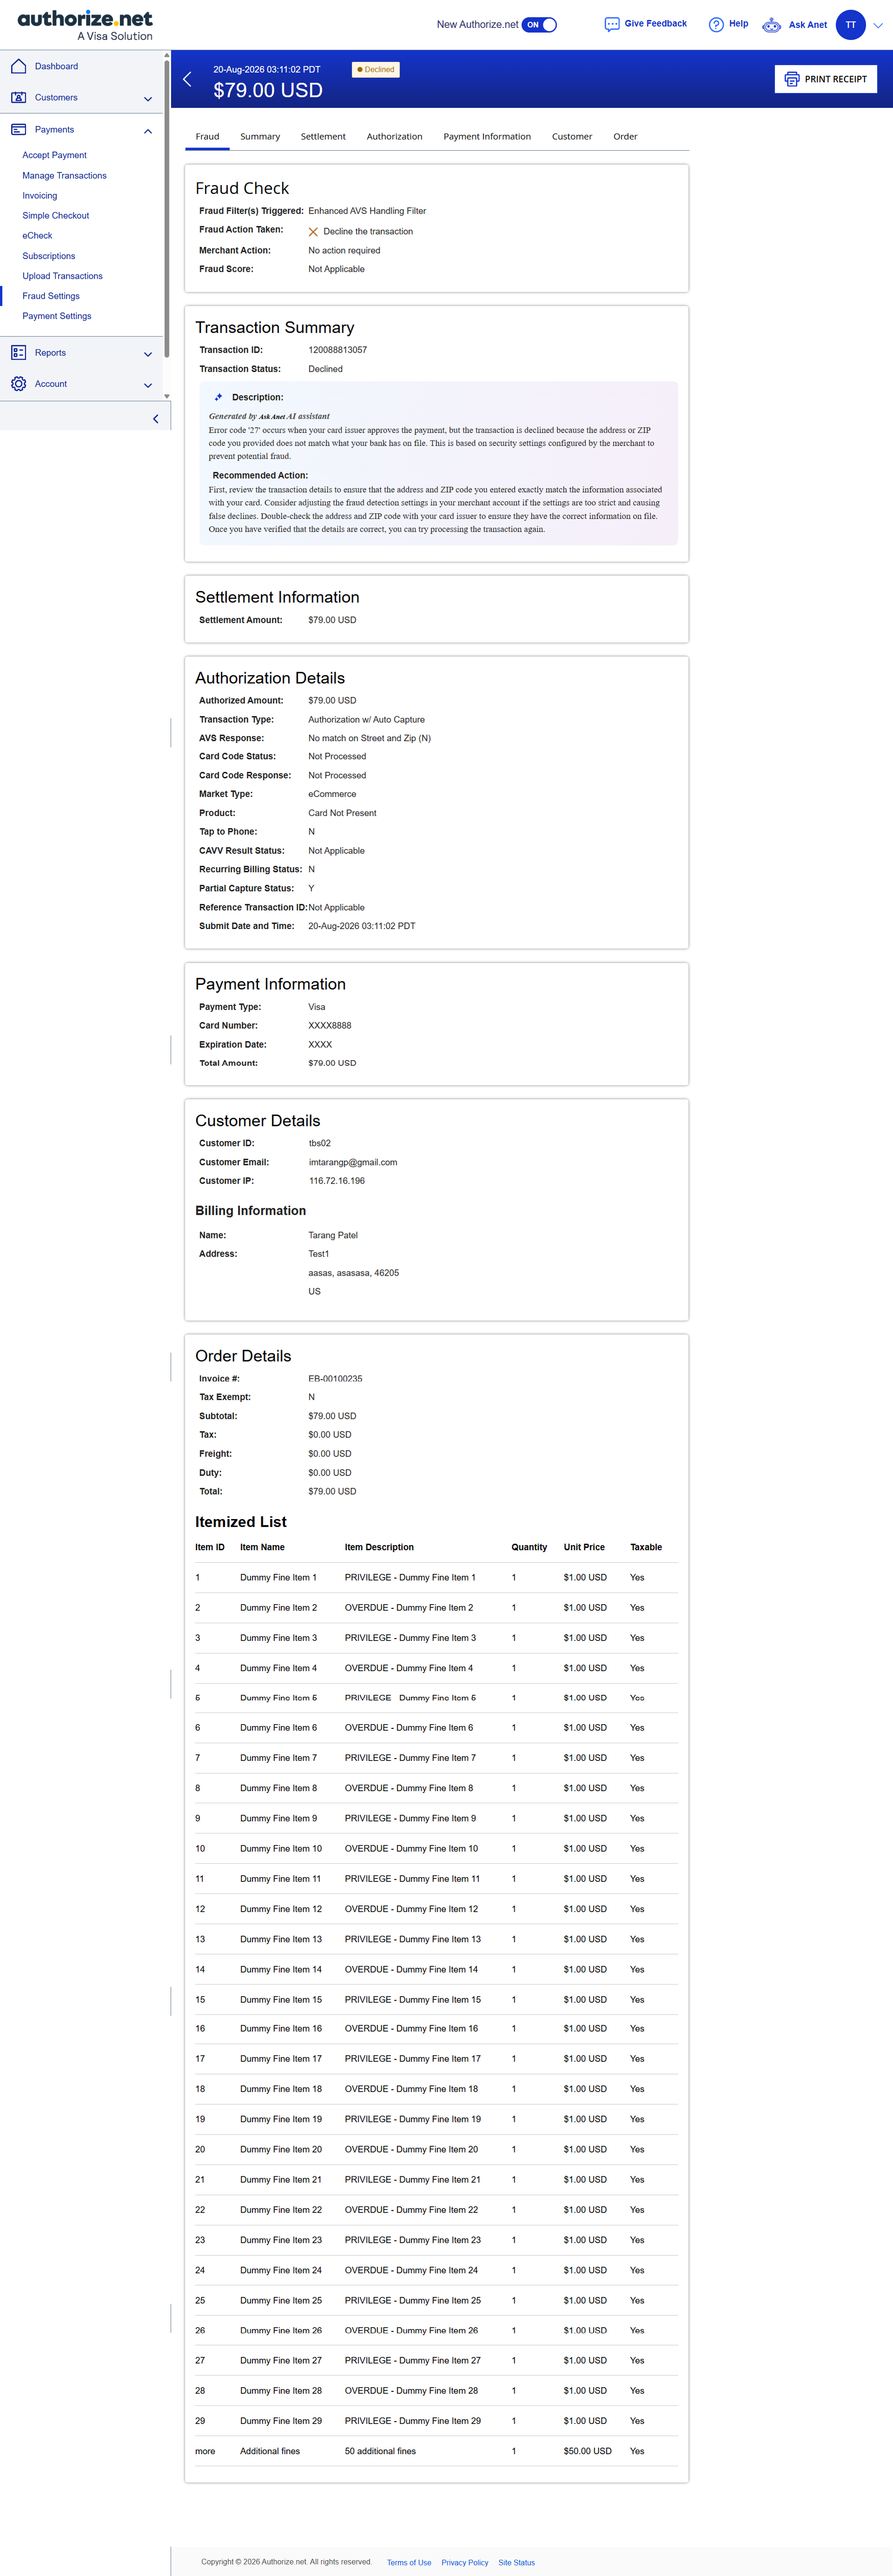
AVS acceptance or decline is determined by the merchant's Authorize.Net configuration. QA must verify the merchant's AVS rules before interpreting an AVS mismatch.
Example: if AVS is set to decline for all mismatches, submitting a transaction with an address that differs from the cardholder's will produce errors on the payment form and in the EasyBooking receipt popup.
Limitations and unsupported features
HTTPS is mandatory for the TBS Accept Hosted integration.
PO Number is not supported as a customer-editable field in the current TBS Accept Hosted form.
Shipping information and CAPTCHA are not currently enabled or supported by the EasyBooking implementation.
Saved payment profiles are not supported.
ACH/bank-account payments are not supported.
TBS does not expose every
Authorize.Nettransaction field as an editable hosted-form field. Where the application supplies a value programmatically, enabling a Merchant Interface checkbox does not automatically make the field customer-editable.TBS does not configure or override the merchant account AVS policy
AVS Configuration
Address Verification Service (AVS) is an Authorize.Net fraud-prevention feature that compares the billing address information submitted with a transaction against the information available from the card issuer.
AVS configuration is controlled at the merchant account level in the Authorize.Net Merchant Interface. The current TBS Portal implementation does not configure or override the merchant's AVS rules.
Therefore:
TBS Portal does not configure AVS acceptance or decline rules.
Merchants should manage AVS settings according to their own fraud-prevention requirements.
TBS does not require a specific AVS rule configuration for the current Accept Hosted payment flow.
The billing address and postal/ZIP code used for the transaction are supplied through the payment flow where applicable.
Changing AVS rules in
Authorize.Netmay affect whether transactions are accepted or declined, but it does not change the TBS payment-form implementation.The AVS test addresses provided in the testing section are intended only to validate
Authorize.Net's AVS behavior in the Sandbox/Test environment.
Important: Unless specifically instructed by TBS Support or required by a future development change, do not modify AVS rules as part of the TBS Portal setup. AVS policy is the responsibility of the merchant's
Authorize.Netaccount.
Sandbox-to-Production Deployment Checklist
Administrator / TBS Support Only
After all Sandbox testing has been completed successfully, perform the following steps before enabling live payments.
Phase 1: Production Credentials
Obtain the Production API Login ID from the production
Authorize.NetMerchant Interface.Obtain the Production Transaction Key.
Replace the Sandbox credentials in the TBS Portal with the corresponding Production credentials.
Verify that no Sandbox credentials remain in the Production configuration.
Phase 2: Gateway Configuration
Enable Gateway = Enabled.
Is Test Mode = Disabled.
Verify that the Production
Authorize.NetAPI endpoint is being used.Verify that the Accept Hosted Production endpoint is being used.
Verify that the configured return, cancel, and other callback URLs are valid Production URLs.
Phase 3: Authorize.Net Payment Form Configuration
Verify the Payment Form – Fields configuration.
Confirm that the Required checkboxes remain configured according to the approved TBS configuration.
Do not enable additional Required fields unless specifically approved by TBS.
Verify that any customized payment-form settings required by TBS are configured correctly.
Confirm that no Sandbox-specific configuration remains.
Phase 4: Controlled Production Transaction
Perform a controlled low-value Production transaction using a real payment method.
Start a payment from the TBS Portal.
Verify that the Accept Hosted Production payment form opens correctly.
Enter valid payment and billing information.
Submit the payment.
Verify that the transaction completes successfully.
Verify the transaction status in the
Authorize.NetMerchant Interface.Verify the transaction amount and transaction details.
Verify that the corresponding payment is correctly recorded/updated in the ILS.
Verify that the customer's outstanding balance is updated correctly.
Verify that the receipt is displayed correctly.
Verify that the receipt shows the expected transaction/payment information.
Phase 5: Post-Deployment Validation
Verify that the TBS Portal logs show successful communication with the Production
Authorize.NetAPI.Confirm that no Sandbox endpoint or credential is being used.
Confirm that refreshing or revisiting the result page does not create a duplicate payment.
Verify the final customer-facing payment status and receipt.
Record the Production transaction ID for deployment validation/audit purposes.
Important: Do not use Sandbox test card numbers in Production. Production transactions use real payment processing and may result in an actual charge.