
How to Upgrade TBS Printing Service silently
If you’re looking to reinstall the TBS Print Client, following a clear and structured process can help ensure a smooth transition and preserve important configuration files. Below, you’ll find a detailed, step-by-step guide to uninstalling the current version and installing the new client using the silent MSI installer.
Prerequisites
Before proceeding, please confirm the following requirements are met:
TBS Portal Version: Your TBS Portal must be running version 5.130.0 or later. This ensures compatibility and access to the latest features and security updates.
.NET Framework: The PC where you plan to install the software must have .NET Framework 4.8 installed.
Step 1: Uninstall the Existing TBS Print Client
Before you install the new client, you’ll want to remove any existing versions. The uninstall process will keep your configuration file (config.ini), so your Guest Pass Printing settings remain intact.
-
Open Windows Settings:
Go to Settings > Apps > Installed apps (or Control Panel > Uninstall a program).
Search for TBS Printing Service in the list.
-
Uninstall the application:
Select the TBS Printing Service, then click Uninstall.
Follow the on-screen prompts to complete the uninstallation process.
-
Verify configuration file retention:
Navigate to C:\Program Files (x86)\TBS\TBS Printing Service\.
Check that the config.ini file is still present. This file stores your Guest Pass Printing settings and should remain untouched by the uninstall process.
Step 2: Locate the Silent MSI Installer
The silent MSI installer for the TBS Print Client is provided on your server. You’ll need to copy it to a local folder before installation.
-
Find the installer:
On the server, go to C:\inetpub\wwwroot\tbsportal\Downloads\Client.
Look for the file named silenttbsclient.msi.
-
Copy the installer:
Copy silenttbsclient.msi to a local folder on the target machine. For example, you might use C:\_TBS\TBS Print Client for easy access.
Step 3: Install the TBS Print Client Silently
Now you’re ready to install the TBS Print Client using the silent MSI installer. This method allows installation without any user prompts, making it ideal for IT deployments.
-
Open a Command Line or PowerShell window as Administrator:
Right-click the Start button and choose Windows Terminal (Admin), Command Prompt (Admin), or PowerShell (Admin).
-
Navigate to the installer folder:
-
Use the
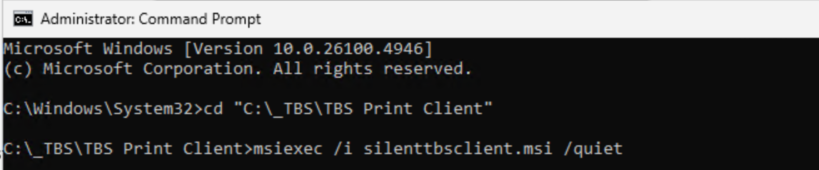
cdcommand to change to the folder where you placed the MSI.Example:
cd "C:\_TBS\TBS Print Client"
-
-
Run the silent installation command:
-
Type the following command and press Enter:
msiexec /i silenttbsclient.msi /quiet
This installs the client with no user interaction. The installation will run in the background and finish automatically.
-

Step 4: Verify Successful Installation
Once installation is complete, it’s best practice to confirm that the TBS Print Client is installed and functioning as expected.
-
Check for the TBS Print Client in installed programs:
Return to Settings > Apps > Installed apps and verify that the TBS Print Client appears in the list.
-
Confirm Guest Pass Printing settings:
Navigate to C:\Program Files (x86)\TBS\TBS Printing Service\ and ensure that config.ini is present and contains your settings.
-
Test printing functionality:
Perform a test print to ensure everything is working as expected.
Tips and Additional Notes
Administrator privileges are required for both uninstalling the old client and installing the new one.
If you encounter any issues or errors, check the Windows Event Viewer and review the installation logs for troubleshooting information.
For bulk deployments, consider using remote management tools or scripts to automate the MSI installation across multiple machines.
By following these steps, you’ll be able to smoothly uninstall and silently reinstall the TBS Print Client while preserving your essential configuration files. If you have any questions or run into trouble, don’t hesitate to reach out to your TBS support contact for further assistance!
Before you get started with installing the software, it’s important to make sure your environment is ready. This article will walk you through the prerequisites you’ll need to check, as well as provide step-by-step guidance to ensure a smooth installation process.
Check if .NET Framework 4.8 Is Installed
Press Windows + R to open the Run dialog.
Type cmd and press Enter to open the Command Prompt.
In the Command Prompt, enter the following command:
reg query "HKLM\SOFTWARE\Microsoft\NET Framework Setup\NDP\v4\Full" /v ReleaseLook for a number in the output. If the value is 528040 or higher, you have .NET Framework 4.8 installed.
If you do not have .NET Framework 4.8, you can download it from the official Microsoft website: Download .NET Framework 4.8.
Follow the installation prompts and restart your computer if required.
Need Help?
If you have any questions or run into issues checking these prerequisites, please reach out to your IT team or contact our support team. We’re here to help make your installation experience as smooth as possible!