
How To Configure TBS 9900 for Copy Control and Copy Prices
Configuring the X7 controller for copy control in your TBS 9900X pay station ensures accurate tracking, pricing, and secure operations for copier access. This guide will walk you through setting up copier types, adjusting necessary parameters, and changing vend prices, so your station is ready for customer use.
Understanding Copier Type Configuration
Selecting the correct copier type is crucial for seamless communication between your 9900X pay station and the attached copier. The copier type determines how the station sends signals, tracks copies, and interacts with different copier models and interfaces.
Standard Parallel Interface: Compatible with most copiers. Requires programming the specific copier type based on the included communication harness (cable).
Smart Serial Interface: Supports select brands, such as Konica-Minolta Biz-Hub (Vender 1/2) and Kyocera-Mita Task-Alfa. Some settings may not be accessible in this mode.
Vend Request Mode: For software-controlled payments (e.g., print management systems). Set copier type to "None" and connect a card reader in "Always Idle" mode via the serial port.
How to Configure the Copier Type
-
Identify Your Copier and Harness:
Check the label on your communication harness for the correct copier type. Always specify copier make and model when ordering or reinstalling to ensure compatibility.
-
Access Programming Mode:
Use the four color-coded buttons on the X7 controller:
Black: Next/Scroll
Green: Enter/Save
Red: Increase
Blue: Decrease
Follow the on-screen menu prompts to enter copier configuration settings.
-
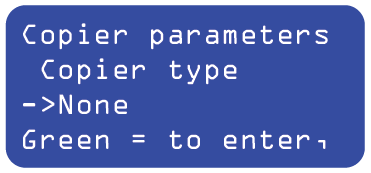
Set the Copier Type:
Scroll to the "Copier Parameters" menu. Use Red/Blue to select the correct copier type as per your harness label and copier model. Press Green to confirm.
Changing Vend Prices and Value Parameters
The X7 controller allows you to set and adjust prices for copies, prints, and other services. You can set different prices for cash and card payments, define minimum deposits, and limit the number of free (bypass) copies.
To Set Vend Prices:
Enter the "Value Parameters" menu using the color-coded buttons.
For each service (e.g., B&W copy, color copy, print), use Red/Blue to adjust the price.
Press Green to save each value and move to the next item.
Press Black to scroll through all price options.
Tip: Do not set a price of $0.00 for color copies on B&W-only copiers. Always match price settings to your copier’s actual capabilities.
Setting Minimum Deposits and Limits:
Minimum Deposit: Choose between NONE, FIXED AMOUNT (set to your highest vend price), or NUMBER OF COPIES. This ensures users deposit enough before copying.
Bypass Limit: Set the maximum number of free copies allowed with a supervisor key (000 = unlimited).
Cash/Card Value Maximums: Set a limit to prevent excessive deposits or card balances.
Testing and Troubleshooting
After configuring copier type and vend prices, test your setup:
Insert coins, bills, or cards and ensure the pay station enables the copier only when enough value is deposited.
Make test copies to verify correct debiting and pricing.
If copies are not debited, or if the copier is enabled without payment, double-check copier type, pulse length, and wiring.
Common Copier Types and Configuration Details
Below are the most frequently supported copier types, along with their setup considerations. Always check the label on your station-to-copier cable or refer to your harness documentation for the exact type.
-
Canon Parallel (Pulse)
Uses standard pulse interface.
Set appropriate pulse length (typically 100–200 ms).
Blind time is important to prevent double-counting; start with 400 ms and adjust as needed.
-
Canon Smart (Serial)
Requires Smart Expansion Board.
Supports color detection.
Use only with compatible Canon models listed in the harness manual.
-
Konica Minolta Smart (Serial)
Requires Smart Expansion Board.
Advanced job tracking and color control available.
-
Ricoh/Sharp/Xerox (Pulse)
Standard parallel connection.
Pulse length: 120–180 ms, typical.
Ensure the harness matches the copier model/series.
-
Kyocera/Mita (Pulse or Serial)
Some models support both interfaces; check your harness type.
Pulse length: 100–140 ms for pulse models.
Serial models require Smart interface and configuration.
-
Toshiba (Pulse or Serial)
Pulse models: 120–200 ms pulse length recommended.
Serial (Smart) models require an expansion board and cable.
-
Vend Request / None
Used only when the Pay Station does NOT directly control a copier.
For print management software setups with a card reader.
No pulse or Smart interface required.
Other copier types may be available depending on your hardware and firmware version. Your harness label and the configuration menu on the X7 controller will display the available types for your system.
Additional Tips and Reminders
Always remove power before connecting or disconnecting peripherals.
If using print management software, set copier type to "None."
For Smart Serial Interface, some settings may not be available—refer to copier documentation for compatibility.
Update the X7 controller’s clock and terminal ID for accurate audit records.
By following these steps, you’ll ensure your TBS 9900X pay station is fully configured for reliable, accurate copy control and pricing.
Important Notes and Warnings
Always match the copier type to the physical harness/cable used. Mismatched settings can result in free copies, missed charges, or copier errors.
Smart interface options only appear if the correct Smart Expansion Board is installed.
If your copier supports both pulse and Smart interfaces, choose the one best suited for your tracking and reporting needs.
After changing copier type, test the system by making a copy and confirming the Pay Station registers and charges correctly.
Consult your copier’s manual for model-specific wiring and signal requirements if you encounter issues.
X7 Manual Download: Click Here
Need Help?
If you have questions about your copier’s compatibility, harness selection, or need help with setup, please contact TBS Inc. support:
Email: helpdesk@tbsit360.com
Phone: 1-630-537-1370
Website: www.tbsit360.com
We’re here to help you get the most out of your 9900X Pay Station!