
How to configure Guest Pass Deletion Tool in the TBS Portal
Managing guest passes efficiently in the TBS Portal just got easier with the new "Guest Pass" settings. This feature lets you automatically delete guest passes after a set number of days and control when the deletion process runs. In this article, we'll guide you step-by-step on how to configure these settings and manage the required service to ensure your changes take effect. *NOTE: This feature is only available from TBS Portal 5.124.0 and up.
Accessing the Guest Pass Configuration
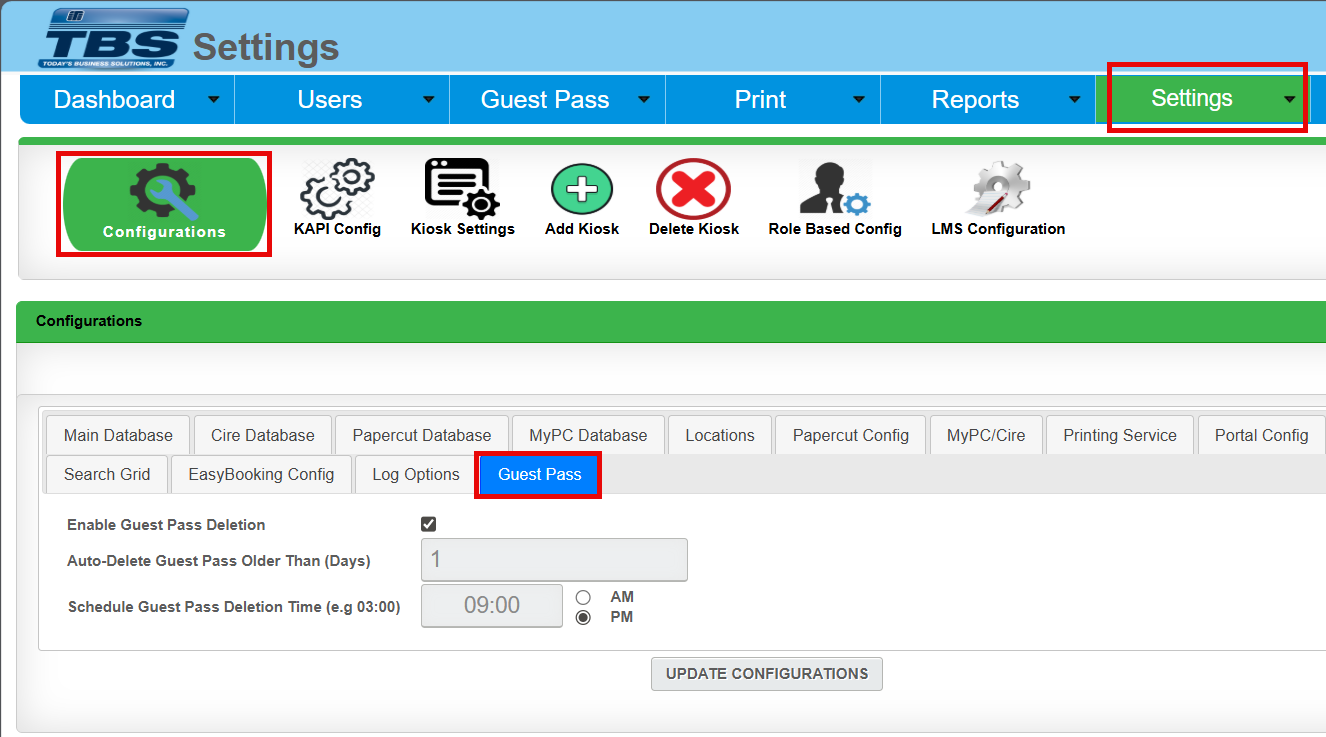
To get started, you'll need to find the new guest pass configuration tab within the TBS Portal.
Log in to your TBS Portal account with the appropriate admin rights.
Navigate to Settings in the main menu.
Click on Configurations under the Settings section.
Select the Guest Pass tab, which now appears in the Configurations area.
Setting Up Automatic Deletion of Guest Passes
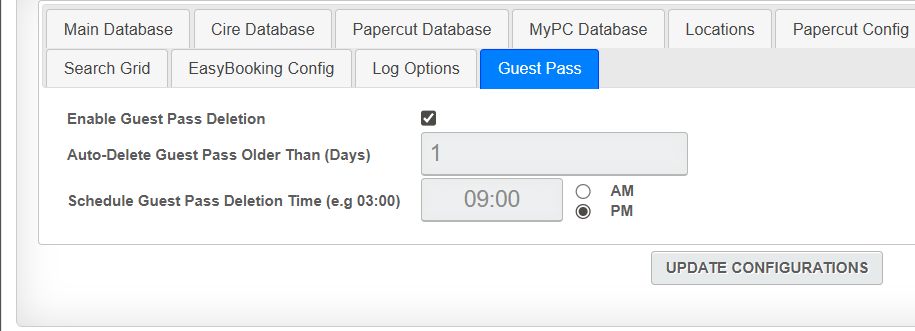
The Guest Pass tab allows you to set how long guest passes remain active before they are automatically deleted.
In the Guest Pass settings, enable the Enable Guest Pass Deletion.
Under the option Auto-Delete Guest Pass Older Than (days), enter the desired number of days (e.g., 7, 30, or any value your policy requires). This determines how long a guest pass remains in the system after it is created.
To set the time when the service deletes the guest passes, edit the Schedule Guest Pass Deletion Time.
Click Update Configurations.
Tip: Choose a duration that strikes a balance between convenience for your guests and security for your organization.
Restarting the Guest Pass Service
For your new settings to take effect, you'll need to restart the related service in the system. This step is essential after any changes to the guest pass configuration.
Locate the TBS Utility Service in your system’s service management area. This could be under a Services tab or within a system administration section.
Stop the service by selecting it and choosing the appropriate option (often labeled "Stop" or "Disable").
Wait a few moments to ensure the service has stopped completely.
Start the service again by selecting "Start" or "Enable".
*IMPORTANT: If you want to DISABLE this, make sure to restart the TBS Utility Service AFTER you disable the feature in the TBS Portal.
Verifying Your Changes
Once you've saved your settings and restarted the service, it’s a good idea to verify that everything is working as expected.
Create a test guest pass and check its expiration date aligns with your new settings.
Confirm that expired guest passes are removed after the scheduled deletion time by checking CIRE Users as well as the Utility Log to confirm if users are being deleted and/or if the service is running successfully. This log is located: C:\Logs\UtilityService
Frequently Asked Questions
What happens if I don’t restart the service? Changes made to the guest pass settings may not take effect until the service is restarted.
Can I change the deletion schedule later? Absolutely! Just update the settings in the Guest Pass tab and restart the service.
That’s it! With these steps, you’ll keep your guest pass system tidy and secure without any manual cleanup. If you have any questions or run into issues, don’t hesitate to reach out to your system administrator or support team for help.