
How To Upgrade 9900 X6/X7 firmware
Updating the board firmware is a critical process that ensures devices operate with the latest improvements, security patches, and features. This guide walks you through each step of the firmware update process using the tools provided by TBS. Whether you’re an experienced technician or new to board updates, this document aims to demystify the process, provide troubleshooting tips, and clarify best practices to minimize risk and downtime.
Prerequisites and Required Tools
Before diving into the firmware update, please ensure you have all the necessary tools and information ready. Missing or incompatible equipment can result in failed updates or even hardware damage.
Serial "X6 Download Harness RS232" Cable - PN: A07300 (Provided by TBS): This specialized cable connects the board to your computer for data transfer.
Serial-to-USB Converter: Converts the serial signal from the harness to USB, making it compatible with most modern computers.
SEM Flash Tool Software (Provided by TBS): The application that manages the firmware upload process.
Firmware File: The specific firmware image provided by TBS for your board model. Confirm you have the correct version.
Windows PC: The SEM Flash Tool requires a Windows operating system.
Administrator Access: You’ll need permission to install and run software and access device ports.
Tip: If you are unsure of the firmware version or your board's compatibility, please contact your TBS support representative before proceeding.
Preparing Your Workspace
Ensure your PC is plugged into a reliable power source. Interruptions during firmware flashing can brick the board.
Close unnecessary applications, especially those that might use USB ports or interfere with device drivers.
Have all tools within easy reach to avoid fumbling during the process.
Minimize the risk of movement or disconnection by placing the board and cables on a stable, static-free surface.
Step 1: Connecting the Download Harness to the Board
Locate the Serial Extender: On the bottom right of the board, find the Serial Extender port. This is where the Serial Download Harness connects. Reference your board’s layout diagram if needed.
Attach the Harness: Carefully align the harness connector with the Serial Extender. Do not force the connection; it should slide in with minimal resistance. Ensure the connector is fully seated.
Note: Some boards may have additional connectors nearby. Double-check the labeling to avoid connecting to the wrong port.
Step 2: Connecting to Your Computer
Attach the Serial to USB Converter: Connect the other end of the Serial Download Harness to the Serial to USB Converter. Verify the orientation—if the converter has pin labels, ensure they match the harness output.
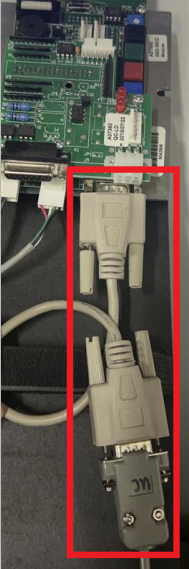
Plug into Your PC: Insert the USB side of the converter into an available USB port on your PC. Preferably, use a port directly on the computer (not a hub) to avoid power or communication issues.
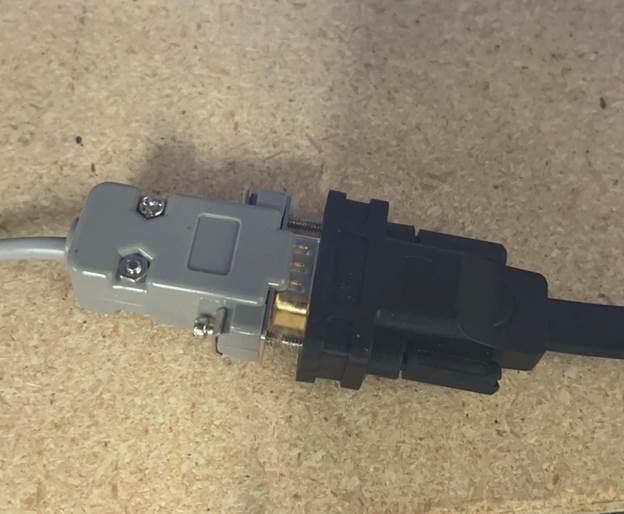
If Windows prompts you to install drivers for the Serial to USB Converter, follow the on-screen instructions or refer to the converter’s documentation. TBS may supply recommended drivers for optimal compatibility.
Step 3: Installing and Launching SEM Flash Tool
Download the Application: Obtain the SEM Flash Tool (.exe) from TBS or your internal repository. Confirm its integrity (e.g., checksum or digital signature) to guard against corrupted downloads.
Launch SEM Flash Tool: Open the application. If prompted by Windows security, allow the program to run. (No installation is necessary to run the application.
Tip: If the application fails to launch or displays errors, try running it as an administrator, or check for missing dependencies (such as .NET Framework).
Step 4: Selecting the Firmware File
Click ‘Browse’: In the SEM Flash Tool interface, locate the option to browse for a firmware file.
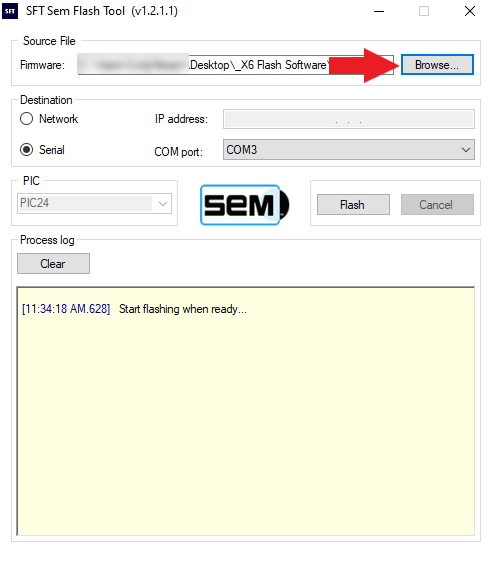
Select the Correct Firmware: Navigate to where you saved the TBS firmware file. Double-check the filename and version before selecting it. Click ‘Open’ to load the file into the tool.
Warning: Flashing an incorrect firmware version can render your board inoperable. Always confirm compatibility with your hardware.
Step 5: Identifying the Serial (COM) Port
Open Device Manager: In Windows, press Win + X and select Device Manager.
Expand ‘Ports (COM & LPT)’: Find your Serial to USB Converter in the list. Note the COM port number (e.g., COM3, COM7).
Select the COM Port in SEM Flash Tool: Back in the SEM Flash Tool, select the corresponding COM port from the available options.
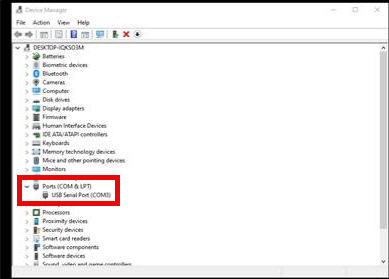
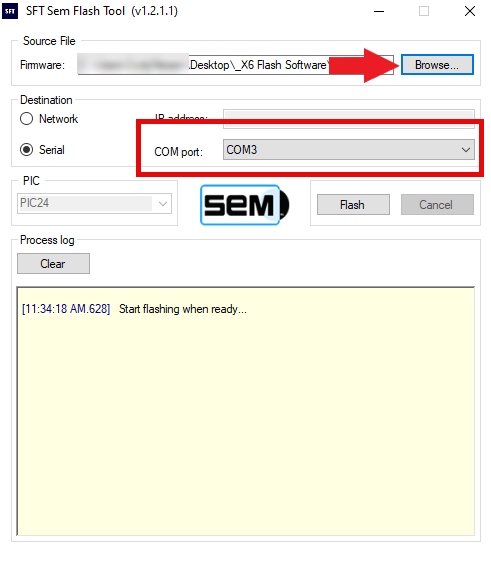
If the port does not appear, try unplugging the converter and plugging it back in, or restarting the Flash Tool. If multiple ports are listed, match the name and number from Device Manager.
Step 6: Flashing the Firmware
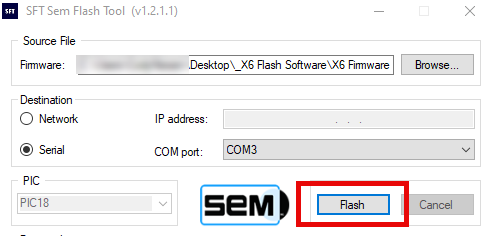
Double-Check All Settings: Confirm the firmware file and COM port are correct.
Click ‘Flash’: Initiate the firmware update by clicking the ‘Flash’ button in SEM Flash Tool.
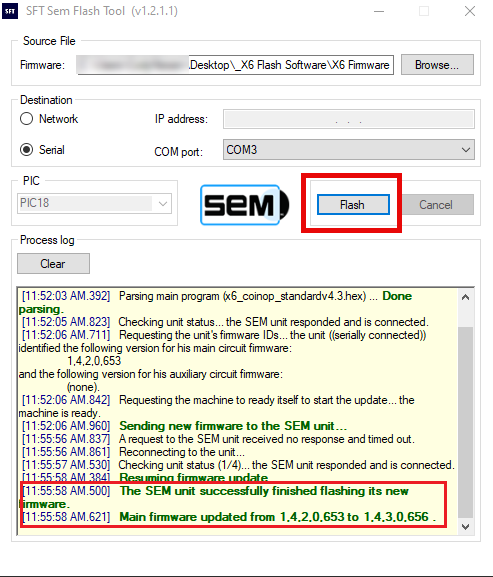
Monitor Progress: The application will provide a progress bar and log output. Watch for error messages or stalls.
Important: During the update, do not disconnect any cables, power off the computer, or close the SEM Flash Tool. Interruptions can corrupt the board firmware and require advanced recovery procedures.
Step 7: Completing the Update
Wait for Confirmation: When the update finishes, the SEM Flash Tool will display a completion message in the log section.
Exit the Flash Tool: Once the log confirms success, you may safely close the SEM Flash Tool application.
Disconnect Hardware: Unplug the Serial-to-USB Converter from your PC, then carefully disconnect the Serial Download Harness from both the converter and the board.
Power Cycle the Board: If applicable, power the board off and on again to ensure the new firmware loads correctly.
It’s good practice to label the board with the firmware version and update date for future reference.
Troubleshooting and Edge Cases
-
Device Not Detected:
Ensure drivers for the Serial-to-USB converter are correctly installed.
Try a different USB port or cable.
Restart the computer and repeat the process.
-
Firmware Flash Fails, or Errors Occur:
Double-check the firmware file version and board model.
Review the log output for specific error codes or messages.
Attempt the flash on another PC to rule out hardware/software conflicts.
If the board becomes unresponsive, contact TBS support for recovery options. Do not attempt to re-flash repeatedly as this can worsen the issue.
-
Board Not Functioning After Update:
Ensure the update completed without interruption.
Try power cycling the board.
Consult TBS support if the board does not boot or shows abnormal behavior.
Best Practices and Additional Tips
Document each update, including board serial number, firmware version, and any issues encountered.
Maintain a backup of the original firmware file when possible, in case a rollback is needed.
Perform updates in a controlled environment (e.g., avoid high static areas or crowded workspaces).
Test the board’s basic functions after