
How to setup SMTP Relay
External SMTP Relay with Exchange Using Anonymous Connections
When authenticated SMTP is not an option you can create a new receive connector on the Exchange server that will allow anonymous SMTP relay from a specific list of IP addresses or IP ranges.
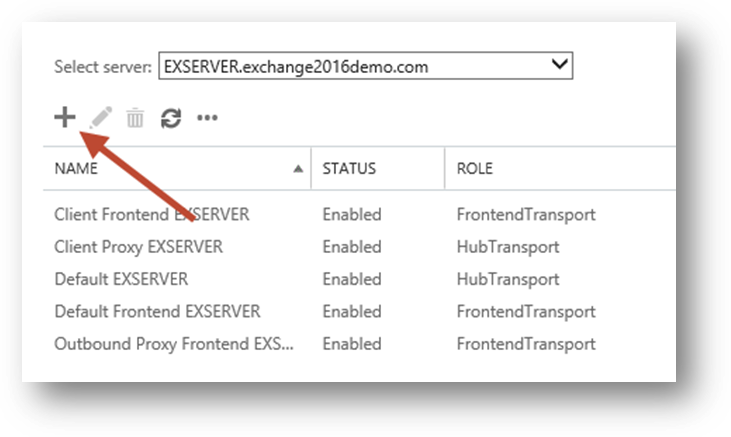
In the Exchange Admin Center navigate to mail flow and then receive connectors. Select the server that you want to create the new receive connector on, and click the “+” button to start the wizard.
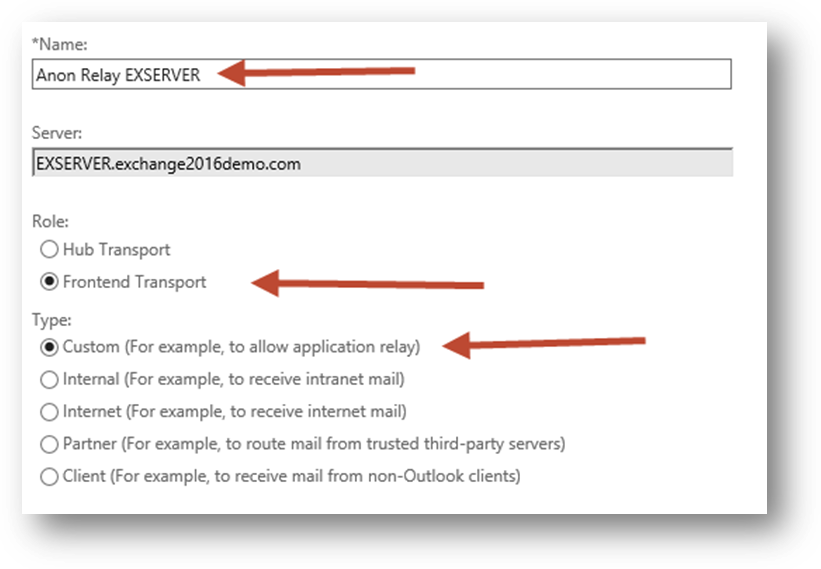
Give the new connector a name. I like to keep the name consistent with the other default connectors. Set the Role to “Frontend Transport”, and the Type to “Custom”.
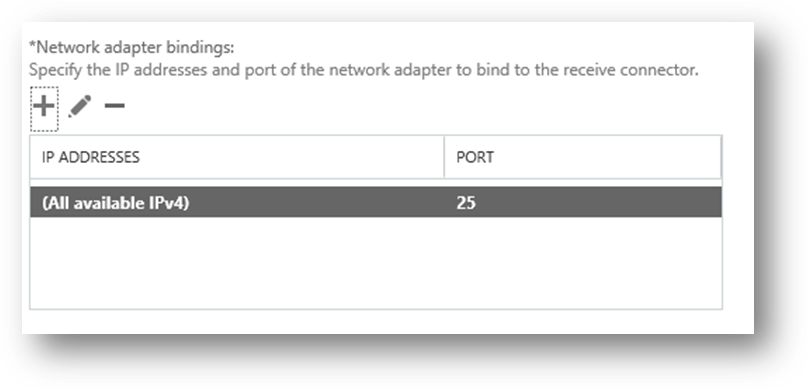
The default Network adapter bindings are fine. This represents the IP and port that the server will be listening on for connections. Multiple receive connectors on the Frontend Transport service can listen on the same port of TCP 25.
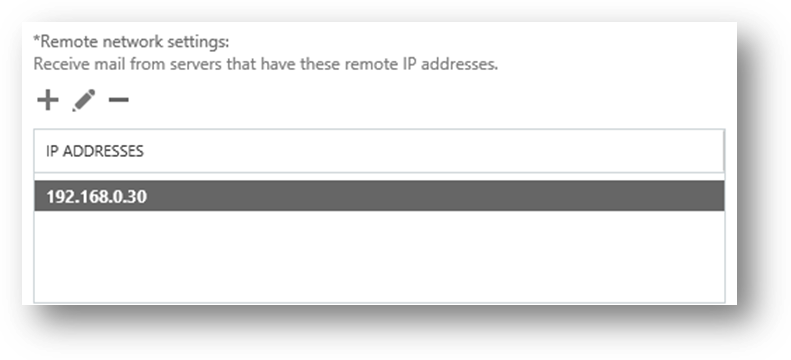
Remove the default IP range from the Remote network settings, and then add in the specific IP addresses or IP ranges that you want to allow anonymous SMTP relay from. I do not recommend adding entire IP subnets that contain other Exchange servers as this can cause issues with server to server communications.
Click Finish to complete the wizard, then there is some additional configuration still required.
In the Exchange Management Shell run the following two commands.
[PS] C:\>Set-ReceiveConnector "EXSERVER\Anon Relay EXSERVER" -PermissionGroups AnonymousUsers
[PS] C:\>Get-ReceiveConnector "EXSERVER\Anon Relay EXSERVER" | Add-ADPermission -User 'NT AUTHORITY\Anonymous Logon' -ExtendedRights MS-Exch-SMTP-Accept-Any-Recipient
We can now test the connector using Telnet from the IP address that was added to the remote network settings of the receive connector. In my test environment that IP address will now be allowed to send email from any email address (whether it is a valid internal address or not) to any external address.
220 EXSERVER.exchange2016demo.com Microsoft ESMTP MAIL Service ready at Thu, 22
Oct 2015 12:59:39 +1000
helo
250 EXSERVER.exchange2016demo.com Hello [192.168.0.30]
mail from: test@test.com
250 2.1.0 Sender OK
rcpt to: exchangeserverpro@gmail.com
250 2.1.5 Recipient OK
Data
354 Start mail input; end with .
Subject: test
.
250 2.6.0 <e1739c5f-db11-4fdd-aa27-a9702bc15b15@EXSERVER.exchange2016demo.com> [
InternalId=863288426497, Hostname=EXSERVER.exchange2016demo.com] Queued mail for Delivery
Troubleshooting
One of the most common issues when troubleshooting receive connector behaviour on an Exchange server is determine which connector is actually handling a given connection. There are two ways to approach this type of troubleshooting.
The first is to set different SMTP banners on each connector. Exchange MVP Jeff Guillet has a PowerShell example that you can run to configure each connector’s SMTP banner with the name of the connector itself, so that when you connect with Telnet you can immediately see which receive connector you’ve connected to.
[PS] C:\>$rc = Get-ReceiveConnector -Server EXSERVER
[PS] C:\>$rc | % {Set-ReceiveConnector $_.Identity -ProtocolLoggingLevel Verbose -Banner "220 $_"}
Now when you use Telnet to connect you will see the connector name in the banner.
C:\>telnet exserver 25
220 EXSERVER\Anon Relay EXSERVER
The other troubleshooting method is to use protocol logging. In the PowerShell example above the protocol log level for each connector was also set to “Verbose”. You can set this on individual connectors if you need to by running Set-ReceiveConnector.
[PS] C:\>Set-ReceiveConnector "EXSERVER\Anon Relay EXSERVER" -ProtocolLoggingLevel Verbose
You can then review the protocol logs to determine what is happening to SMTP connections. I generally recommend you leave protocol logging enabled for receive connectors at all times.
External SMTP Relay with Exchange Using Authentication
Exchange has a receive connector designed to be used by clients that need to send via SMTP called “SERVERNAME\Client Frontend SERVERNAME”, for example “EXSERVER\Client Frontend EXSERVER” in my test environment.
[PS] C:\>Get-ReceiveConnector
Identity Bindings Enabled
-------- -------- -------
EXSERVER\Default EXSERVER {0.0.0.0:2525, [::]:2525} True
EXSERVER\Client Proxy EXSERVER {[::]:465, 0.0.0.0:465} True
EXSERVER\Default Frontend EXSERVER {[::]:25, 0.0.0.0:25} True
EXSERVER\Outbound Proxy Frontend EXS... {[::]:717, 0.0.0.0:717} True
EXSERVER\Client Frontend EXSERVER {[::]:587, 0.0.0.0:587} True
Minimal configuration is required to get this working. Assuming you’ve already configured an SSL certificate for Exchange, and added a DNS alias for your SMTP devices and applications to use (I’m using a DNS alias of mail.exchange2016demo.com in this example), you should then also set the TlsCertificateName for the receive connector.
Use Get-ExchangeCertificate to identify the thumbprint of the SSL certificate you’ll be using.
[PS] C:\>Get-ExchangeCertificate
Thumbprint Services Subject
---------- -------- -------
FC5259C0528657EF22BB818CA9B23FD220A9DE83 ...WS.. CN=mail.exchange2016demo.com, OU=IT, O=LockLAN Systems Pty Ltd,...
FE6528BE1548D81C794AE9A00D144FF3D16E0CD2 ....S.. CN=Microsoft Exchange Server Auth Certificate
DAB089E53CA660DEF7B8EE303212C31C0E3D3499 IP.WS.. CN=EXSERVER
17839AF62AA3A1CBBD5F7EC81E92A609976D8AD9 ....... CN=WMSvc-EXSERVER
The syntax of the TlsCertificateName string is made up of two different attributes of the certificate, so I use the following commands to apply the configuration to my receive connector.
[PS] C:\>$cert = Get-ExchangeCertificate -Thumbprint FC5259C0528657EF22BB818CA9B23FD220A9DE83
[PS] C:\>$tlscertificatename = "<i>$($cert.Issuer)<s>$($cert.Subject)"
[PS] C:\>Set-ReceiveConnector "EXSERVER\Client Frontend EXSERVER" -Fqdn mail.exchange2016demo.com -TlsCertificateName $tlscertificatename
To test using the Client Frontend connector to send an email message I’m going to use PowerShell’s Send-MailMessage cmdlet instead of Telnet. First, capture some valid credentials to use for authentication.
PS C:\>$credential = Get-Credential
Next, use the Send-MailMessage cmdlet with parameters specifying the server, to and from addresses, subject line, and the port number.
PS C:\>Send-MailMessage -SmtpServer mail.exchange2016demo.com -Credential $credential -From 'adam.wally@exchange2016demo.com' -To 'exchangeserverpro@gmail.com' -Subject 'Test email' -Port 587 -UseSsl
In the above example the email is successfully received by the external recipient. So any device or application on the network that can use authenticated SMTP can be set up to use that connector listening on port 587 on your Exchange server.